 |
|
 09-02-2015, 07:30 PM
|
#21
|
1 Rivet Member 
1967 22' Safari
Oklahoma City
, Oklahoma
Join Date: Jul 2015
Posts: 9
|
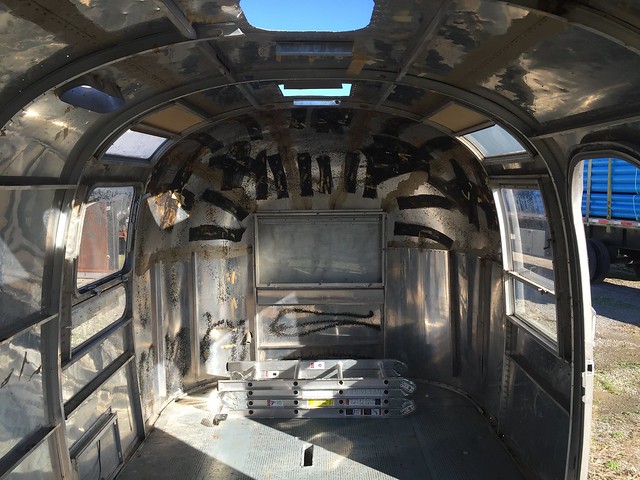
I just picked up our 67 tradewind this morning. The exterior looks pretty good, but we plan on gutting the interior this weekend and modernizing it over the next few months. We will have to do the "shell off" restoration, due to rusting in the bathroom.
Are there any videos that explain/show detail of the process?
We will attempt to remove the whole interior so that appliances and woodwork can be sold and used elsewhere.
Any other info would be greatly appreciated!
Live Riveted! 
|

|

|


|
09-03-2015, 12:31 PM
|
#22
|
Rivet Master  
1986 34' Limited
1975 27' Overlander
1969 21' Globetrotter
Conifer
, Colorado
Join Date: Jun 2009
Posts: 8,319
|
Hi OKC, welcome to Air Forums. Congratulations on your mid sixties Trade Wind acquisition. They are a nice size for comfortable traveling in my view. I know they are 24 footers, but in 69 they grew a foot. Even today almost 50 years later, the 25 footers are probably the most popular size. Maybe the most bang for the buck.
Atomic13 is working on his Trade Wind, and streamer24 has a 67 he is starting on. So you are going to start down the "slippery slope" too. It's fun, and it's time consuming. I've been working on mine for nearly two years. I also had the infamous rotted rear bath floor. The frame was okay. It took its maiden voyage about 4 weeks ago. I'm happy everything worked as planned. Water, electrical, propane, axles, etc. But I still have several projects to do on it. I posted a picture of it in an earlier post to this thread.
Don't be surprised if it takes much longer than you are planning, even working 50 hours a week on it. They come apart much much easier than they go together.
OKC, check out the Airstream Knowledge Base toward the bottom of the Forums page. See all the trailer models, and pick Tradewind, then pick your year range. There are likely "full monty" threads where folks did a ground up renovation of their trailer. The Safari is 2 feet shorter (single axle) and the Overlander is 2 feet longer with dual axles. The only real difference is the length and the interior layout. The basic construction, windows, and systems are the same. My owners manual is generic for all models for 1966. So you can learn about removing axles, removing the interior, removing the shell (aluminum body), and repairing the frame. Start reading, that's one way to learn. Ask questions here on Air Forums is another. Actually doing it is the best.
David
|
|
|
|
|
12-27-2015, 09:30 PM
|
#23
|
4 Rivet Member 
1968 24' Tradewind
1968 26' Overlander
Detroit
, Michigan
Join Date: May 2015
Posts: 467
|
Gantries complete... preparing for lift off
Finally found some time to make progress on the shell off portion of the restoration. Since I last posted I removed all the wiring, vents, fans, and the AC.
In preparation for the shell separation we braced the internal frame with four 2x6's screwed to the ribs. My dad and I welded two "heavy duty" gantries. It's been fun to learn how to use a plasma cutter and MIG welder. We had four generations (my grandpa, dad, myself and my son) in the shop teaching and learning these skills.
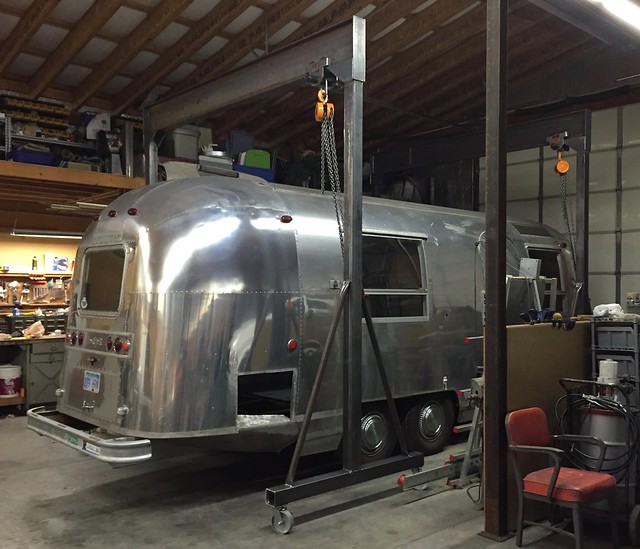
The gantries are obviously overkill for my Airstream project. However, they'll see use when flipping the new frame we are welding for the Tradewind and also for my dad to repair his semi trucks (moving motors in and out, flipping flatbed trailers for repair, etc)
For my frame, we decided to use 11 gauge 2" x 6" rectangular tubing for most of the frame (main rales, A frame, out riggers, etc). I'll likely use this tubing for few cross pieces between the frame rales (to support the front and rear plywood and just fore and aft of the axles). We have other smaller options to support the plywood seams but haven't decided which to use (light 3" angle, 11 gauge 2" or 3" tubing???). All of these decisions will increase the weight of the frame but I'm not all that concerned about it. I'll feel more comfortable putting a bike rack or cooler on the back via a receiver hitch. We also plan to extend the A frame depth from 3' to 4' to make room for two 30# propane bottles plus a generator or two.
Next up is to order holding tanks so we have them before starting the frame welding... I'm thinking of keeping my freshwater tank at 30 gallons and targeting a grey tank(s) in the 40-50 gallon range and the black tank around 20-25 gallons. Sound good? Typically will have 2 adults and 2 kids in the trailer.
Any suggestions for type/brand of coupler and jack? I'm seriously considering ditching the electric jack I have now and use a manual crank.
|
|
|
|
|
12-28-2015, 05:35 PM
|
#24
|
4 Rivet Member
1968 24' Tradewind
1968 26' Overlander
Detroit
, Michigan
Join Date: May 2015
Posts: 467
|
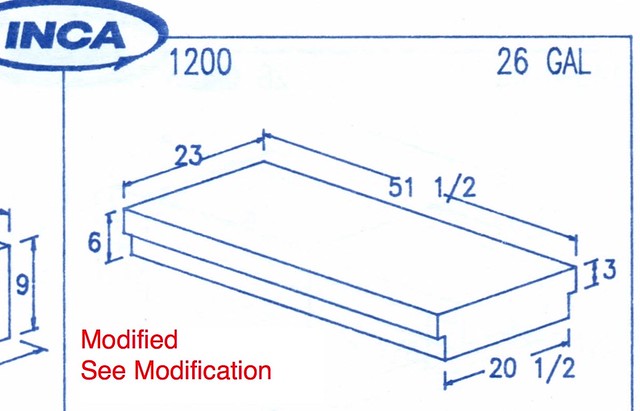
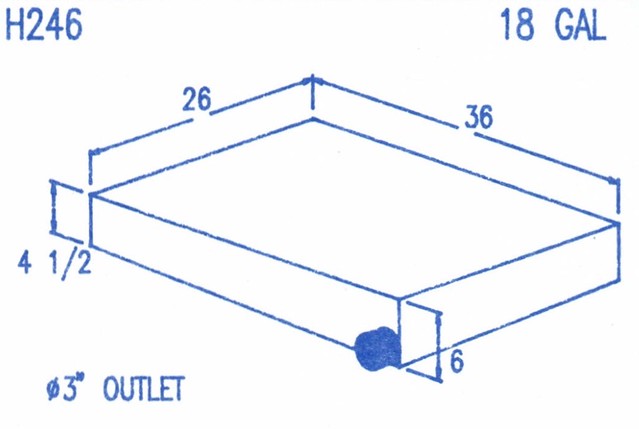
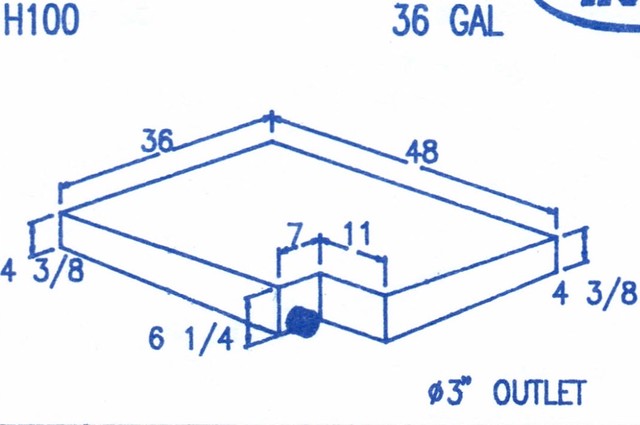
Did some research on waste tank options today and found some contenders. I'm targeting a grey water capacity of ~50 gallons and a black water capacity of somewhere around 15 to 30 gallons. Based on the dimensions of my Dexter axles, I'll have 52.25 inches between my two 2x6 frame rails. Since I'm welding my own frame, I have some leeway regarding cross beam locations (so long as the floor junctions are supported. As a result, I'm leaning toward the tanks below from Inca Plastics.
The three tanks (two grey, one black) will be plumbed together using two self actuating Valterra valves. I plan to plumb these tanks together and have a single bayonet exit the belly pan about 5 feet behind the rear axle just inside the street side frame rail. The Valterra valve cables and pulls will pass through the frame rails near the street side bumper (outside the belly pan).
One question came up regarding the above plan. With only 3/4" of remaining space between frame rails my subfloor heating duct will no longer be able to extend to the rear of the trailer. What have others done with their heating duct when adding gray tanks. Should I re-route them outside of the main frame rails (i.e. through the outriggers)?
Grey tanks (two just aft of the axles plumbed in series, 26 gallons each, 52 gallons total):
Black tank option 1 (18 gallons):
Black tank option 2 (36 gallons):
|
|
|
|
|
12-28-2015, 05:50 PM
|
#25
|
Rivet Master
1966 24' Tradewind
1995 34' Excella
Lynchburg
, Virginia
Join Date: Jun 2006
Posts: 4,226
|

Quote:
Originally Posted by Atomic_13

[img]https://farm6.staticflickr.com/5659/23933851701_a12e354852_z.jpg[/img
Any suggestions for type/brand of coupler and jack? I'm seriously considering ditching the electric jack I have now and use a manual crank.
|
My jack died and I felt kind of helpless not being able to disconnect the Airstream from the tv. I decided to install a manual jack so I would not have that problem again. I figured with the light tongue weight, I would be strong enough to operate it. If I wasn't maybe I shouldn't be camping. So far, so good. I have been thinking about a mod so I could operate it with my portable drill.
Dan
|
|
|
|
|
12-29-2015, 09:40 AM
|
#26
|
2 Rivet Member 
1968 30' Sovereign
Rockford
, Michigan
Join Date: Apr 2014
Posts: 34
|
For my '68 Sovereign, I was able to fit 3 of the larger tanks from Vintage Trailer Supply between my frame and crossmembers. The 2 grey tanks are connected under the belly pan, and both are vented on top. I am not able to post pictures from this computer, but if you are interested, I can do so later.
I'm enjoying following your progress. My shell is back on my repaired frame and new floor, and I am currently working on my electrical systems.
Best,
Mark
|
|
|
|
|
12-29-2015, 01:19 PM
|
#27
|
Rivet Master
1986 34' Limited
1975 27' Overlander
1969 21' Globetrotter
Conifer
, Colorado
Join Date: Jun 2009
Posts: 8,319
|
Hello atomic 13. I was in KC the last of October visiting family. My family moved there in 71 and we have been visiting ever since. It seems like home to me.
You probably figured out your trailer ride height considering your inch deeper frame rails and your new Dexter axles (maybe with 32" starting angles, many Dexters are 32 degrees.) Seems like everything on an Airstream is related to something else. There are lots of constraints. Just a watch out so your trailer isn't way up in the air like some jacked up pick ups. I might add that the outriggers and side belly wraps are built around a 5" frame. Going to 6" will affect this wrap also.
Since you are fabricating a heavy duty frame, you have many options for your waste water tanks. I had to select ones that would fit in the frame "bays". You are wise to select your tanks now so you can build your new frame around them. I sourced my tanks from Inca Plastics and was happy with the tanks and their service.
Inca introduced me to rubber "grommet" connections for the drain and vent lines which made plumbing the drain lines easier. I did not have to specify the exact locations so Inca could "spin weld" connection fittings to my tanks. They even have one for the 3 1/2" toilet connection. I recommend you ask Inca about them. All I had to do was cut holes in the subfloor with a hole saw where my drain lines penetrated it, trial fit up the tanks, mark the holes in the floor on to the tanks with a sharpie, drop the tanks, and then hole saw the locations into the plastic tanks. We used similar grommets in the factory I worked in for plastic fuel and hydraulic tanks. When you install the pipe, they expand tight against the plastic. They work good.
I elected to install tanks that empty below the frame rails on my 66 Trade Wind for simplicity in the drain manifold and valve location. Most modern campers do this, including my 86 Airstream. I had a tank cover made that bolts to the frame rails and cross members. This tank cover is insulated and I ran a flex duct to the cavity to keep the tanks and valves from freezing. It all seems to work.
As you know, Airstream heated these old mid sixties trailers with a furnace that dumped heat into the galley and then underfloor plenum with ducts to the front gaucho area and the rear bath for cold air return. I elected to reverse this plan with heat ducts under the floor and the cold air return above the floor. This made it easier to heat the waste water tank cavity.
David
|
|
|
|
|
12-30-2015, 10:41 AM
|
#28
|
4 Rivet Member
1968 24' Tradewind
1968 26' Overlander
Detroit
, Michigan
Join Date: May 2015
Posts: 467
|
@Dan - good points regarding the jack. A manual jack would simplify things, especially during the renovation phase (prior to the electrical being completed)
@Mark - If you have easy access to a picture of your holding tank layout, I'd like to see it.
@David - KC is a great city. If you are ever pulling your trailer through let me know. I'd love to see it in person. My guess is I still have a few years of work on mine before I get it out to Colorado. We plan to boondock a lot in your beautiful state. My wife isn't as keen as I am about climbing mountains, fly fishing, and sleeping in the dirt. Our AS will provide her a nice place to hang out and relax while we are out on our "suffer-fests"
As for the trailer height, I'm fortunate that the starting angle of my axles are 22.5 degrees (down) and not higher. As a result of the 6" frame rail, the trailer will sit 1 inch higher than stock but I'm of the opinion that the benefits (stronger frame for a bike rack, larger holding tanks, etc) outweighed the cons.
I've been thinking about how to address the extra inch of frame height and the banana wraps. With our plasma cutter, it's a snap to taper the 2x6 rectangular tubing we plan to use to create our outriggers. What I haven't decided is if I should shape them such that the banana wraps still fit the outside curve of the outrigger but then slopes to 6 inches at the main frame rail (essentially the bottom of the outrigger would slope from 5 to 6 inches as you move toward the main frame rail). Alternatively, I could simply make the outriggers using factory 5" dimensions and 1" of frame rail would be exposed under the length of the trailer. Not sure which to do, yet.
Thanks for letting me know about the grommets from INCA plastics. Those are slick. I've used bulkhead fittings before but have never seen a push in grommet connection like that. Do you think they seal well enough to use them on the sides of tanks (e.g. connecting two grey tanks in series)?
Lastly, I hadn't considered using flexible heating ducts. That would be very versatile. Where did you pick that up? I know the big box home stores sell aluminum and foil duct but yours looks more durable that that.
|
|
|
|
|
12-31-2015, 07:33 PM
|
#29
|
Rivet Master
1986 34' Limited
1975 27' Overlander
1969 21' Globetrotter
Conifer
, Colorado
Join Date: Jun 2009
Posts: 8,319
|
Talk to Inca about using their grommets on a horizontal wall with vibration. All of my grommets are used on top of the tank. But we used a similar design in fuel and hydraulic tanks on the side walls as well as the bottom. It would not be hard to specify a spin weld fitting on the side walls of your tanks since the exact location can be easily specified. It might be a challenge to get the lead tank to drain completely.
Here is the link (I hope) to DW incorporated, the manufacturer of RV flex ducting. I opted for non insulated ducting as I wanted it to fit in the oval holes in the cross members. I subsequently insulated around the ducts with rigid foam insulation cut to fit. The heat I loose will keep the subfloor warm somewhat.
Flexible Ducting / Uninsulated Flex - DW Inc.
They also make many of the duct "fittings" that connect the system all together. I elected to run my heated air under the subfloor and out through floor vents with the cold air return under the galley cabinets.
You've given thought to your frame rail decision. My Trade Wind at about 4500 GVWR sits on a 5" by 1 1/2 by 3/16 thick C channel frame rails. Flimsy but works. The cross members are welded into the channel. Airstream built lightweight frames supported by the subfloor and then the shell itself. Semi-monocoque construction. 5" fully boxed adds considerable strength. If I recall correctly, my 86 Limited is built with 6" channels. Photos below.
David
|
|
|
|
|
01-11-2016, 12:06 PM
|
#30
|
4 Rivet Member
1968 24' Tradewind
1968 26' Overlander
Detroit
, Michigan
Join Date: May 2015
Posts: 467
|
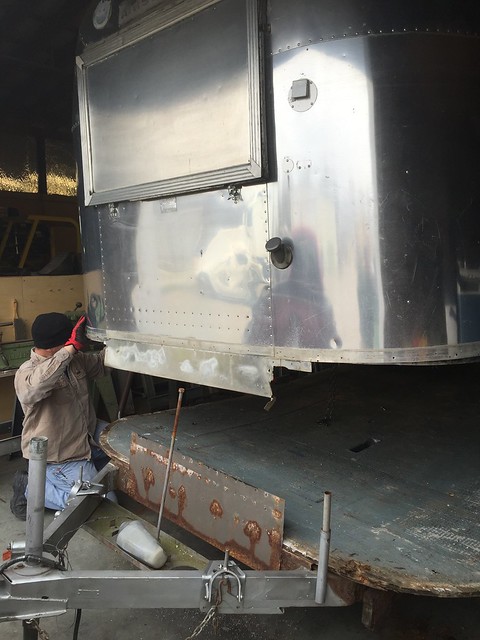
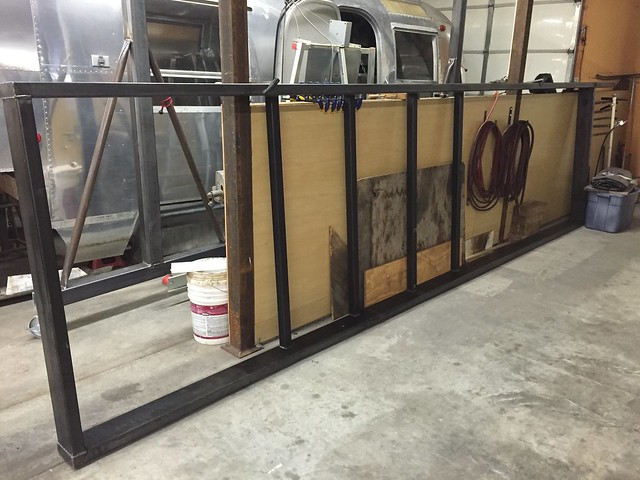
We have liftoff!
@David - thanks for the links to the flexible vents.
I made some progress over the weekend.
Lifted the shell
Do you think I need a new frame? (note the bend as a result of the frame rails breaking when we stood on them after the shell was off)
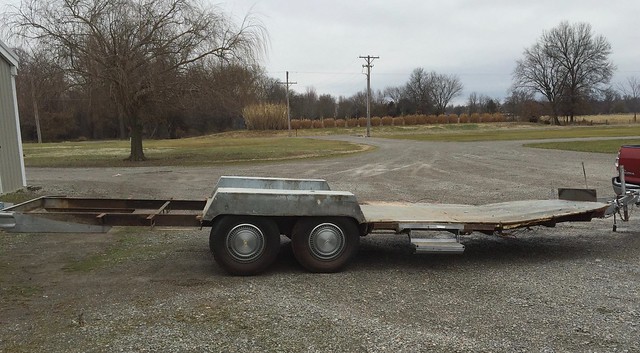
Cleared the trailer frame
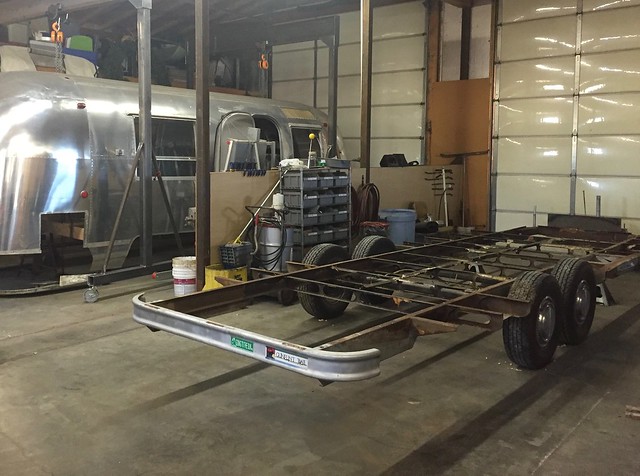
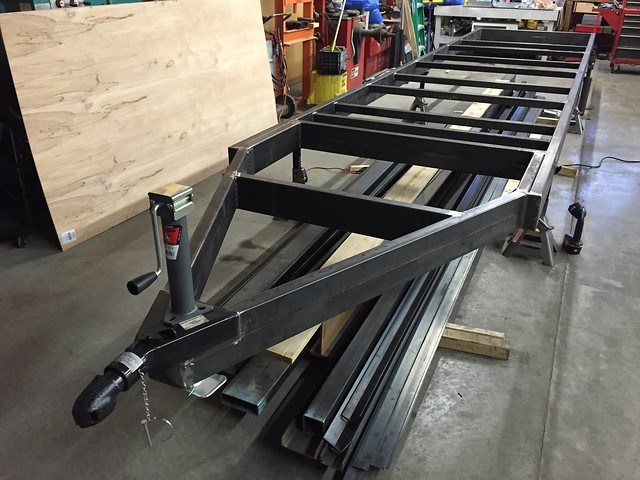
Got the new frame rails and a few cross members (2x2s) welded square and level.
I've created a punch list for future work. For anyone who has done this before, please let me know if you have suggested edits (different order, new ideas, etc)- WITH THE FRAME ON ITS SIDE
- Install remaining 2x2 cross beams, continue to drop every other cross beam by 5/8" for subfloor spines/junctions
FLIP FRAME RIGHT SIDE UP
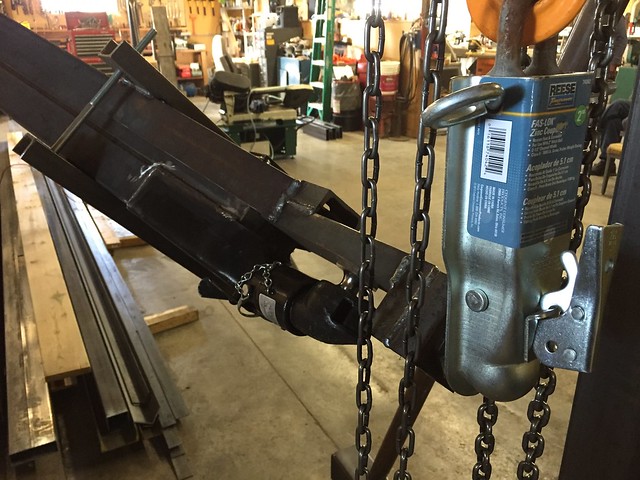
- Create A frame with 50 degree coupler that protrudes 1 foot longer than stock, attach to main frame
- Weld bumper to frame
- Create rotisserie clamps for A frame and rear bumper
FLIP FRAME UPSIDE DOWN (rest on floor jacks)
- Create axle mounting plate (using 4" angle iron) and attach to frame
- Install axles, wheels and tires (verify axles are perpendicular to frame by measuring from the center point of the coupler to each axle hub, leave a small space between axles and frame to allow belly pan metal to slide through)
- Install trailer jack
FLIP FRAME RIGHT SIDE UP (via gantries)
- Plasma cut 5" c channel outriggers (using jig), attach to frame (all should be level with top of frame rails with exception of doorway/step outriggers which need dropped by 1/16" to accommodate 14 gauge steel plate)
- Attach 14 gauge steel plate below entry way (to protect subfloor from elements and reinforce entry way floor)
- Attach hold down plate to A frame
- Attach receiver hitch to rear bumper (bike rack) and awning side (for a slide in outdoor table)
- Paint frame with Eastwood frame primer and topcoat paint
- Epoxy plywood edges
- Install 6" plywood splines via (self tapping screws) on 2x2 cross members at plywood joints
- Repair and install fender wells
- Install plywood with elevator bolts around perimeter (skip areas involving front and rear curved c channel), glue and screw plywood to splines, use countersunk self tapping screws to affix plywood to 2x2s at mid point of boards
- Transfer underlayment pattern board to subfloor (cut front and rear curves, and holes for toilet flange and shower drain P trap)
- Pre fit grey and black tanks, cut holes for drains and vents
- Epoxy newly cut plywood edges
- Install front and rear curved c channel using elevator bolts
FLIP FRAME UPSIDE DOWN (rest on floor jacks)
- Install plastic P trap bowl under subfloor
- Install spare tire holder under A frame
- Install grey and black tanks (support tanks using galvanized struts with rubber spacers to prevent tank chafing) - (Do I need to make galvanized tank boxes???)
- Install plumbing
- Weld 2" straps across outriggers and at trailer mid point below 2x2s for belly pan attachment (protect tanks from sparks)
- Install conduit and run 7 wire cable, break lines, and separate brake actuator wires, etc
- Run tank sensor wires
- Install reflectix and fiberglass insulation
- Install flexible heating duct from heater location to front and rear of trailer (install flapper valves near grey and black tanks to heat tank areas)
- Install belly pan
- Install 4 BAL stabilizer jacks
FLIP FRAME RIGHT SIDE UP
- Weld platform for generator and LP tanks
- Fill and level plywood floor gaps and defects
- Install marmoleum sheet (should this be done prior to attaching c channel???)
|
|
|
|
|
01-11-2016, 01:10 PM
|
#31
|
Rivet Master
1971 21' Globetrotter
Currently Looking...
Currently Looking...
Currently Looking...
Arvada
, Colorado
Join Date: May 2006
Posts: 3,530
|
You may what to think about full size gussets at the intersection of the cross members and frame rails. You wouldn't want the outriggers (and shell weight) to roll the bottom of the frame rails. It looks pretty beefy and I doubt it would happen, but you know what they say, "an ounce of prevention".
|
|
|
|
|
01-11-2016, 06:02 PM
|
#32
|
4 Rivet Member
1968 24' Tradewind
1968 26' Overlander
Detroit
, Michigan
Join Date: May 2015
Posts: 467
|
Quote:
Originally Posted by Aerowood
"...think about full size gussets at the intersection of the cross members and frame rails."
|
Excellent suggestion that I'll strongly consider. It wouldn't add much weight to weld a 3" to 4" triangle below each 2x2 at the corners.
We considered the pros/cons of 2x2 cross beams located at the top of the frame rails. We were hoping that with the addition of the axles at the mid point of the frame box would stabilize the bottom of the frame rail from being pushed inward.
|
|
|
|
|
01-11-2016, 07:49 PM
|
#33
|
Rivet Master
1986 34' Limited
1975 27' Overlander
1969 21' Globetrotter
Conifer
, Colorado
Join Date: Jun 2009
Posts: 8,319
|
Congratulations on lifting the shell. Not very many Airstreamers have done this, and I am one who has not. But it is the best way to repair, or replace the frame.
Your old frame didn't have much strength left. But it also demonstrates the strength of the semi monocoque construction. The frame is built lightweight and rather flimsy, but add the subfloor and add the shell, at all becomes strong. Some Airstreams suffer rear end separation due to rusted out rear cross members. When the body becomes disconnected from the frame at the rear, the frame will sag, and sometimes buckle just behind the axles.
Your new frame looks very stout.
I remember watching the "frame prep" station at the Airstream factory. They had a rotisserie and did work on the frame as they flipped it around. It left that station with tanks, plumbing, axles, belly pan, subfloor, electrical, ductwork, etc, etc.
David
|
|
|
|
|
01-12-2016, 05:13 PM
|
#34
|
4 Rivet Member
1968 24' Tradewind
1968 26' Overlander
Detroit
, Michigan
Join Date: May 2015
Posts: 467
|
Plan update (input from Colin Hyde)
I had a great phone conversation with Colin Hyde who very kindly reviewed my punch list and future plans and provided some expert opinion. I cant tell you how impressed I was with his knowledge and ability to communicate complicated ideas in straight forward language. Since there are others on the forum who are building frames, I thought sharing this level of detail may be useful. Here are my take away points from our phone conversation (Colin - please weigh in if I didnt summarize your suggestions correctly):
Its essential that cross members and outriggers be welded completely and securely to both the top, sides, and bottom of the frame rails (not just with spot weld tacks). Lots of forces are exerted at this junction (especially common for the top welds of the outriggers to break).
Installing 5 outriggers on a 6 frame (my original plan) may very well lead to compression of the side walls of the main frame rales as a result of torsional forces. Evidently, this was a problem in some Airstreams that lead to a manufacturer recall. The downward forces exerted on the perimeter of the plywood edges (from the C channel and what's attached to it) are transferred into the most outward point of the outriggers. These forces are then transferred through the outriggers into the main frame rail (especially at the lowest point where the outriggers meet the frame rail). If this point occurs on a weak part of the frame rail (any portion not supported by the top or bottom of the frame rails horizontal metal) side wall compression may occur (which would obviously weaken the frame).
This principle also is justification for Aerowoods comment suggesting I consider installing gussets inside the frame rails attached to the 2x2 cross members to prevent the bottom edge of the frame rail from rotating inward. Ideally I would have had 11 gauge steel bent into a 6 tall C channel for my outriggers and frame rails. We ordered extra 2x6 rectangular tubing so I might use that for my outriggers (probably overkill). Since Ive already committed to using 2x2 tubing as cross members, Colin suggested simply adding 2 inch angle iron at the bottom of the frame (under each 2x2 tube) would be just fine. These would also be useful for attaching the belly pan and supporting grey tanks.
Ill need to figure out how to route my grey tank plumbing since the 2x2 angle will obstruct the bottom path that was originally unobstructed in my first plan. I wonder if Aerowoods suggested gussets in the grey tank area would work (leaving room for plumbing)?
Enclose all 2x6 end caps with metal plate/welds to avoid vermin, moisture, insects, etc from entering.
Install two outriggers side-by-side in front and behind of each fender well to help support the forces that span above the wheels (no outriggers are possible in this area due to the tires).
Extending the A frame by a foot should be fine and make room for generators, tanks, etc.
If my A frame is inset a bit in between my main frame rails, such that the front end of the frame rails extend past the bend in the A frame (bottom part of the A) I should add a cross piece that extends from the end of the frame rail to the beam angling towards the coupler (essentially creating a small triangle). This helps significantly with stability and also further supports the floor.
Regarding axle mounting plates, Airstream has attached a 3/16 plate to the outside of the frame (via fish plating). Colins shop uses 1/4 metal. The holes on old trailers may not match the pattern used in modern axles.
Install an aluminum liner below the plywood in the front of the trailer for the spare tire compartment.
Install the marmoleum flooring after the interior walls are attached and the furniture is ready to be installed (do not install it before attaching the shell to the frame)
Consider moving the black tank inside the trailer and not leave it in the belly pan (so it doesnt freeze at night)
Lastly, I decided to use 16 gauge (rather than 14 gauge) galvanized steel for the area under my entry way step (will need to protect the aluminum from oxidation).
|
|
|
|
|
01-18-2016, 09:37 PM
|
#35
|
4 Rivet Member
1968 24' Tradewind
1968 26' Overlander
Detroit
, Michigan
Join Date: May 2015
Posts: 467
|
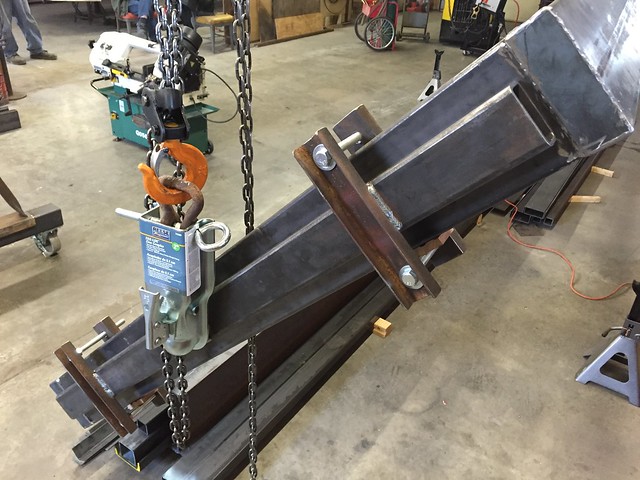
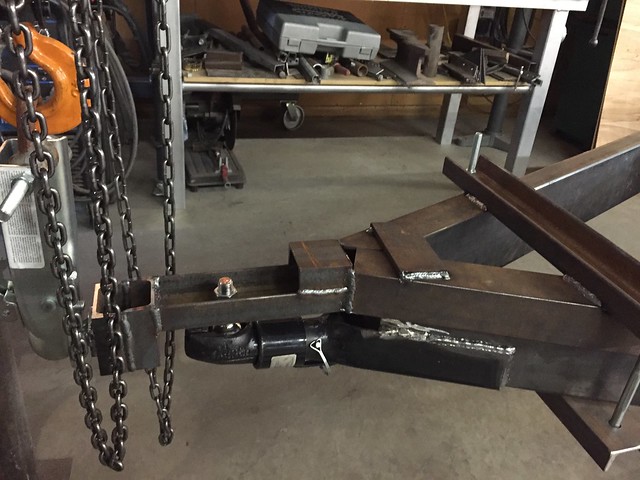
frame update
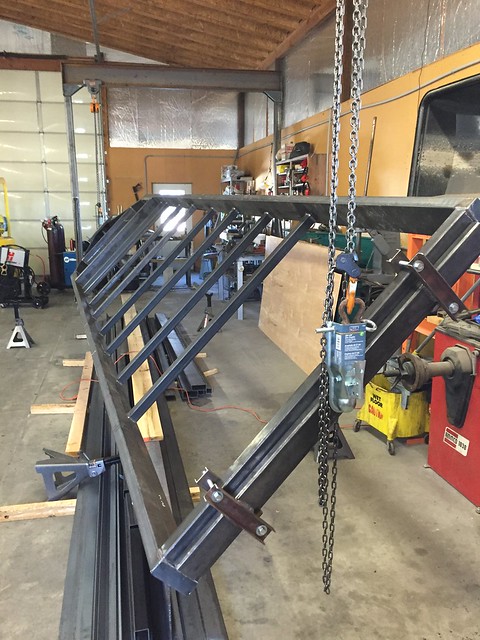
Knocked out the A-frame/coupler, the remaining cross members, and fabricated mounting clamps for the frame rotisserie over the past weekend. I'm pleased the gantries held under load. It was something else to flip the frame with one hand. This will save a ton of time.
Next up is the outriggers, axle mounts, bracing the cross members to the bottom of the main frame rails (gussets), and some minor bracing for a spare tire holder, holding tanks, and the belly pan.
We decided to use 2x6 11 gauge rectangular tube for my outriggers. This will add ~65# to the frame compared to having 6" tall C channel bent from hot rolled 11 gauge plate. Personally, the outriggers seem under engineered given how much weight they bear. The radius of the curve on my stock outriggers perfectly match that of a 6" hole saw. This curve on the stock outriggers starts tapering 2" down the outside edge from the top of the outrigger and ends on the bottom of the outrigger 11.5" from the frame rail.
I'll fabricate the outriggers by cutting the 2x6 tube to 14.5" in length (all my outriggers measured this length) and plasma cut the curve with a wooden template that saddles over the top of the rectangular tube (so I can cut both sides of the 2x6 with the same template/jig).
The curve on my new outriggers will need to start tapering 3" from the top of the frame (rather than 2"). On my 1968, the body skin wraps under the outriggers. My decision to use a 6" tall frame will require I move the steel belly pan attachment strap (that runs fore and after under the outriggers) outward by ~ 1". I'm hopeful that it will not be all that noticeable.
A remaining unknown are the banana wraps. Make new ones or reshape the olds ones to fit the extra 1" frame height? Not sure what to do here, yet...
|
|
|
|
|
01-19-2016, 06:58 AM
|
#36
|
Rivet Master
1971 21' Globetrotter
Currently Looking...
Currently Looking...
Currently Looking...
Arvada
, Colorado
Join Date: May 2006
Posts: 3,530
|
Nice, I wish I had your shop. The management here at work won't let me work on my GT in the hanger. I think they are a little narrow minded.
|
|
|
|
|
01-19-2016, 02:16 PM
|
#37
|
4 Rivet Member
1968 24' Tradewind
1968 26' Overlander
Detroit
, Michigan
Join Date: May 2015
Posts: 467
|
@Kit - it's my dad's shop. Designed for keeping his semi truck on the road. I'd argue there isn't a better place to restore an airstream. Brian
|
|
|
|
|
01-19-2016, 07:15 PM
|
#38
|
Rivet Master
1986 34' Limited
1975 27' Overlander
1969 21' Globetrotter
Conifer
, Colorado
Join Date: Jun 2009
Posts: 8,319
|
Nothing like a good shop to work in. I rented space in a building for the last 3 winters. It provided something to do for an old retired guy during the long, cold winters in Minnesota. Winters are for working on old Airstreams, and summers are for traveling in them.
Atomic, you're in the trailer fab business. The frame looks very stout indeed. I'll bet the gross vehicle weight rating of your "new" Airstream will be much higher than the original if the axles, brakes and tires keep up.
David
|
|
|
|
|
01-20-2016, 05:33 AM
|
#39
|
4 Rivet Member
1968 24' Tradewind
1968 26' Overlander
Detroit
, Michigan
Join Date: May 2015
Posts: 467
|
Welding one frame only is my plan. It's hard work. I'm estimating the frame will come in at about 1200#s.
Hopefully with all the other planned additions (AGM batteries, solar, Tex) I'll stay under 5000# which is still a lot lighter than a new AS. 
|
|
|
|
|
01-20-2016, 06:10 PM
|
#40
|
4 Rivet Member
1968 24' Tradewind
1968 26' Overlander
Detroit
, Michigan
Join Date: May 2015
Posts: 467
|
Forgot to add that I plan use my new trailer to haul the old to the frame to metal reclaim. They'll weigh the old frame metal and I'll ask nicely for them to weigh the new frame as well. Sheepishly, I'll post the weight difference here. 
|
|
|
|
|
|
|
Currently Active Users Viewing This Thread: 1 (0 members and 1 guests)
|
|
|
 Posting Rules
|
You may not post new threads
You may not post replies
You may not post attachments
You may not edit your posts
HTML code is Off
|
|
|
|

 Recent Discussions
 |
|
|
|
|
|
|
|
|
|
|
|
|
|
|
|
|
|
|
|
|
|


 Linear Mode

