 |
|
 02-28-2007, 09:26 AM
|
#81
|
Rivet Master 
1968 24' Tradewind
Eureka
, California
Join Date: Nov 2005
Posts: 697
|
I have, polished the letters on mine- sorta started- to be exact. They have a clearcoat on them, so I stripped them first and polished. Some of the blue comes off, but I plan to paint that anyway. If it looks bad I think I'll get new ones. But that's a project reserved for after MY HUSBAND polishes!!
|

|

|


|
02-28-2007, 10:23 AM
|
#82
|
Rivet Master
1966 22' Safari
1979 30' Argosy
Armada
, Michigan
Join Date: May 2004
Posts: 950
|
Quote:
|
Originally Posted by Gen Disarray
Can anyone tell me what to think about when selecting the correct unit? I went to the bestconverter site (I think thats it) and was bewildered by the selection  . If it is of importance, I have also orderd a Yamaha 2400is to use with the camper while boondocking...... |
I had a 35 amp Univolt in my coach. You may have the same or a 45 amp unit. I personally recommend going with the 45, given the size of your coach. That's what I went with. I actually got a two stage manual Iota, with the option to later buy what is essentially their version of the charge wizard, should I ever want it. Cost is of course lower than an auto three stager. You may want the 3-stager if you are plugged in for a long time, in order to trickle charge it to keep it topped off. My advice is this:
3-stage:
1)45 amp WFCO
2)45amp Intellipower
2-stage(with option for 3):
1)45 amp Iota
Again, I have the Iota, and could not be happier. I have a thread that I need to update that talks about my installation.
|
|
|
|
|
03-01-2007, 01:00 PM
|
#83
|
|
Naysayer

1968 24' Tradewind
Russellville
, earth
Join Date: Jun 2005
Posts: 4,967
|
Cyclo Polisher - Aluminum Kit
For those of you who polish, is this a good deal? ($343)
The kit includes: - 1 Cyclo Polisher
- 2 Foam Combo Pads
- 12 Cotton Terry Bonnets
- 2 Mircofiber Terry Bonnets
- 1 Lb of Nuvite Grade S
Vintage Trailer Supply - Vintage travel trailer parts and supplies!
I'm estimating that materials for this (buying what I need including a rotary buffer) should be about $500. Does this seem ballpark correct?
|
|
|
|
|
03-01-2007, 04:13 PM
|
#84
|
Rivet Master
1967 26' Overlander
Huntsville
, Alabama
Join Date: Dec 2003
Posts: 3,018
|
Support small business
Quote:
|
Originally Posted by Gen Disarray
... is this a good deal? ...
|
It could be; I don't know since I have never polished an Airstream.
But if I was to wake up tomorrow & decide to polish my Overlander, I would purchase VTS's kit because Steve has worked with my in the past, and I applaud what he doing for the Airstream community. Confirmation that Steve appears to be a good guy occurred after I heard Tim interview him on theVAP.
Tom
|
|
|
|
|
03-01-2007, 04:27 PM
|
#85
|
Rivet Master
1973 23' Safari
1977 23' Safari
2018 25' Flying Cloud
Palmer Lake
, Colorado
Join Date: Oct 2005
Posts: 4,092
|
Quote:
|
Originally Posted by Gen Disarray
For those of you who polish, is this a good deal? ($343)
...
|
Could be, Rodney. Best price I found for a cyclo 3 years ago was $273. The Nuvite is another, what, $40?
Jbond has the right answer--you finish with the Cyclo, but you'll need a variable speed polisher from Harbor Freight and about 6-8 wool bonnets from the Nuvite people, plus some F7 and C grade to start.
The only reason to get a cyclo early is that you'll find it impossible to not polish some 2x2' spot to a mirror finish just to prove you can do it. Then it's back to the month of polishing with the rotary polisher just so you can get close enough to a finish to finally use the cyclo.
Zep
|
|
|
|
|
03-03-2007, 11:53 AM
|
#86
|
Rivet Master
1966 22' Safari
1979 30' Argosy
Armada
, Michigan
Join Date: May 2004
Posts: 950
|
Rod, I looked back at the close up of the Rock Shield. Here's that photo:
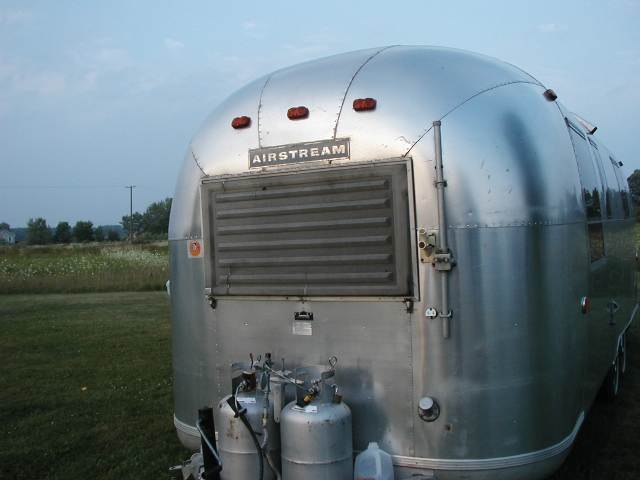
If I'm correct, that's an aluminum or stainless steel frame, with a corrugated plastic sheet in it, attached with rivets. I don't know what is on the back side of that panel. Check to see if it is glued, too. Also, is there a gasket to protect the camper skin? This will be easy. There's two ways to go:
1)Replace the plastic with smoked Lexan. Make sure and use Lexan or polycarb, not Plexiglas or acrylic. You can find it at home depot or Lowe's , but if they don't have it, try online or a local window tinting shop-I think Ziebarts have converted over to doing tinting. Replace the old panel with the new piece: if those are rivets holding it in, look around until you find fender washers that have a hole small enough for the rivets and use them on the backside of the plastic panel. Either replace or add some rubber bumpers on the back, using 3M epoxy, but make sure the catches at the bottom can hook on.
2)Ok, really daring? Here's another option. You'll want to spend some time browsing TomW's site before attemping this stunt: Fabricate a replacement corrugated panel. I haven't done this sort of thing, so don't take my work for it. In fact, I won't even go into steps I don't know how to do, but you should be able to do it using the West System epoxy or something similar.
Bottom line is that you have all of the necessary hardware, but the plastic panel is cracked. Replace it with something workable and you're in business.
|
|
|
|
|
03-03-2007, 12:36 PM
|
#87
|
|
Naysayer
1968 24' Tradewind
Russellville
, earth
Join Date: Jun 2005
Posts: 4,967
|
Thanksfor the eccellent instructions John. Its a disapointment that these covers are no longer available as I would really rather have it look original. Having said that, I suspect undertaking to make one from scratch may be beyond my talents. It would be pretty cool though.....
|
|
|
|
|
03-11-2007, 04:19 PM
|
#88
|
|
Naysayer
1968 24' Tradewind
Russellville
, earth
Join Date: Jun 2005
Posts: 4,967
|
It was a dark and stormy night
.. Oh wait, thats another story altogether. It was actually a sunny and pleasant afternoon so I went hiking for a bit and then decided when I got home to putter around the Trade Wind for a bit. This was the first afternoon this spring that has been nice enough when I also had the opportunity to fuss with it. I didnt set out with much of a plan but it was worth while.
First thing was to put a coat of teak oil on my cook table. I confess I have never put much effort into taking care of this thing since it is cheap and I kept thinking I would toss it if nobody would take it off my hands. Then I realized that it wouldnt be that much of a pain to tote around and it would be nice when boondocking. So I decided to give it a much needed treatment with then teak oil and beef up the hardware. I may try and put some sort of sealant on as well. For what it is worth, also in the picture is something I do with my propane tanks that ride in the back of the truck that has turned out to be pretty helpful. I keep them in old milk crates. This makes them easy to tote about and dramatically improves their balance.
I was also finally able to get the carcass of the previous awning off of my treasure! (happy dance). Other than the extra holes and the metal screws the previous awning didnt leave to much in the way of scars. Question for you Zip Dee owners: am I correct in thinking they come out 6ft? I got to stepping off the 6 ft and then recalled that the vintage awnings come out 9ft. That is a lot more space all things considered
I also started grinding down the entrance step in preparation for a repainting. I can tell this is going to end up being a project all by itself. Tomorrow I will order the stripper for the clear coat and maybe start pulling out the carpet. I figure if I get it apart I will have to get on getting it all back together again
. All and all not a bad afternoons start.
|
|
|
|
|
03-13-2007, 12:57 PM
|
#89
|
|
Naysayer
1968 24' Tradewind
Russellville
, earth
Join Date: Jun 2005
Posts: 4,967
|
Quote:
|
Originally Posted by AYRSTRM2
1)Replace the plastic with smoked Lexan. Make sure and use Lexan or polycarb, not Plexiglas or acrylic. You can find it at home depot or Lowe's , but if they don't have it, try online or a local window tinting shop-I think Ziebarts have converted over to doing tinting. Replace the old panel with the new piece: if those are rivets holding it in, look around until you find fender washers that have a hole small enough for the rivets and use them on the backside of the plastic panel. Either replace or add some rubber bumpers on the back, using 3M epoxy, but make sure the catches at the bottom can hook on.
|
Does anyone know if other colors are available other than clear and smoke?
|
|
|
|
|
03-13-2007, 02:41 PM
|
#90
|
|
Vintage Alum. Enthusiast
1959 24' Tradewind
Phoenix
, Arizona
Join Date: Feb 2002
Location: I currently do not own a 2nd Airstream
Posts: 4,360
|
Lexan comes in clear. I used Lexan to fabricate the vent cover for the rectangular opening on the top front of my trailer. I believe the reason for the tinted or smoked coloring on the front window cover is so that when it is open it acts like a window awning. Me? I prefer to be able to look through the trailer with the rear view mirror when towing, so a colored one is out of the question.
Brad
FF
__________________
4CU 2699 / AIR 10 / TAC AZ-1
I'm haunted by aluminum.
Charter Member of the 4 Corners Unit.
|
|
|
|
|
03-13-2007, 08:05 PM
|
#91
|
|
Naysayer
1968 24' Tradewind
Russellville
, earth
Join Date: Jun 2005
Posts: 4,967
|
Floor
This afternoon after I got home from work I pulled out the old carpet and got most of the underlying tiles up. To my vast relief there was virtually no sign of rot. One concern that I do have is the crack in the tiles (see pic) at the junction of two plywood floor sheets. Is this normal in an older unit or is it an bad sign? The only rot I saw was near the door (red arrow) and not at all advanced. Do I recall correctly that there is a treatment I can apply to that section? Also, when I put in the wood laminate floor, should I remove the toilet lay the floor then reinstall?
|
|
|
|
|
03-13-2007, 09:13 PM
|
#92
|
|
Naysayer
1968 24' Tradewind
Russellville
, earth
Join Date: Jun 2005
Posts: 4,967
|
How is this attached?
The clear coat stripper is supposed to arrive either late this week or early next. While I was walking around the Trade Wind tonight, I realised that I have no idea how to remove the rear land yacht sign (or how to refurbish it for that matter)  . Any helpful comments?
|
|
|
|
|
03-13-2007, 09:21 PM
|
#93
|
|
Vintage Alum. Enthusiast
1959 24' Tradewind
Phoenix
, Arizona
Join Date: Feb 2002
Location: I currently do not own a 2nd Airstream
Posts: 4,360
|
I believe the Land Yacht emblem has studs coming out the back and protruding into the skin with little locking washer looking things. Can you acces the back of the exterior skin? I just got a MHMA emblem off a '59 and painted it with model car paint from those little bottles. If you wait a bit after applying it, you can take the excess off with a wooden toothpick pretty easily. Came out better than I thought it would. Pix to follow.
Brad
FF
__________________
4CU 2699 / AIR 10 / TAC AZ-1
I'm haunted by aluminum.
Charter Member of the 4 Corners Unit.
|
|
|
|
|
03-13-2007, 09:43 PM
|
#94
|
|
Vintage Alum. Enthusiast
1959 24' Tradewind
Phoenix
, Arizona
Join Date: Feb 2002
Location: I currently do not own a 2nd Airstream
Posts: 4,360
|
Here's the pic. Keep in mind, this thing is only 2 inches long. Wish I had taken a 'before' picture.
Brad
FF
__________________
4CU 2699 / AIR 10 / TAC AZ-1
I'm haunted by aluminum.
Charter Member of the 4 Corners Unit.
|
|
|
|
|
03-13-2007, 10:23 PM
|
#95
|
|
Retired.
Currently Looking...
.
, At Large
Join Date: Jun 2003
Posts: 21,276
|
I did something similar with the "Argosy" letters on ours a few years back.
Testors gloss black paint on the inlaid parts of the letters. Looked good.
__________________
Meddle not in the affairs of dragons, for you are crunchy, and taste good with ketchup.
Terry
|
|
|
|
|
03-14-2007, 10:38 AM
|
#96
|
|
Naysayer
1968 24' Tradewind
Russellville
, earth
Join Date: Jun 2005
Posts: 4,967
|
I'm guessing a silver color but......
As far as I can tell looking at the "Land Yacht" emblem, it appears that it had a silver color originally. Is this correct, or should it be blue (my second guess), or something else. I tried looking at images of other AS's from that era but was unable to come up with much. Thanks!
|
|
|
|
|
03-14-2007, 07:11 PM
|
#97
|
|
Naysayer
1968 24' Tradewind
Russellville
, earth
Join Date: Jun 2005
Posts: 4,967
|
Quote:
|
Originally Posted by flyfshr
I believe the Land Yacht emblem has studs coming out the back and protruding into the skin with little locking washer looking things. Can you acces the back of the exterior skin?
Brad
FF
|
I dont see a reasonable way to access the back of the exterior skin. Ideas anyone? 
|
|
|
|
|
03-15-2007, 09:16 AM
|
#98
|
Rivet Master
1968 24' Tradewind
Eureka
, California
Join Date: Nov 2005
Posts: 697
|
I am also getting to the stage of polishing... I guess I'm just leaving it on, and polishing by hand around it- a bit tedious- but less scary than not being able to get it back on- for good!
If I remember, mine seems to be chrome-ish with blue as an outline around the letters (very faded).
***For the rock guard, I re-used all the old stuff, and bought a cheap piece of plexi, from the local place. My plan is- use it for now (better than the duct tape and cardboard) and buy clear lexan (see thru- like FlyF) later with new aluminum trim... etc. I know I'll need a project next winter...
I'm also going to do the fabric 'pillow-case' awning for the guard, so it will cover the ugly plexi---- it was a cheap fix (and experiment).
|
|
|
|
|
03-15-2007, 07:19 PM
|
#99
|
|
Naysayer
1968 24' Tradewind
Russellville
, earth
Join Date: Jun 2005
Posts: 4,967
|
68 Trade Wind diagrams
Not sure if these are of use to anyone else, but I cobbled this together for my own use. I can provide better copies if anyone needs them.
|
|
|
|
|
03-15-2007, 08:31 PM
|
#100
|
|
Naysayer
1968 24' Tradewind
Russellville
, earth
Join Date: Jun 2005
Posts: 4,967
|
68 Trade Wind artist view
Here is an artist view of the version I have.
|
|
|
|
|
|
|
Currently Active Users Viewing This Thread: 1 (0 members and 1 guests)
|
|
|
 Posting Rules
|
You may not post new threads
You may not post replies
You may not post attachments
You may not edit your posts
HTML code is Off
|
|
|
|

 Recent Discussions
 |
|
|
|
|
|
|
|
|
|
|
|
|
|
|
|
|
|
|
|
|
|


 Linear Mode

