 |
|
 12-23-2010, 04:56 PM
|
#121
|
|
Restorations done right
Commercial Member
1962 26' Overlander
1961 26' Overlander
Vintage Kin Owner
Currently Looking...
Baltimore
, Maryland
Join Date: Aug 2007
Posts: 5,545
|
It's just a trailer not rocket science. You can handle running 110 or 12 volt if I can. Have a little self confidence.
|

|

|
|
12-23-2010, 05:42 PM
|
#122
|
Rivet Master 
1973 27' Overlander
Loganville
, Georgia
Join Date: Nov 2007
Posts: 1,741
|
Frank:
Thanks for the motivation. I will go after it. My head is swimming all over the place from electrical, gas lines, replacing the dump valve etc. The good thing is I am slowly getting there. Doing as much as I can when I can. I just need some weather to work with.
Brian
__________________
Brian & Adrienne
|
|
|
|
|
12-24-2010, 03:19 PM
|
#123
|
Rivet Master 
1966 26' Overlander
Woodstock
, Georgia
Join Date: Feb 2002
Posts: 8,525
|
I agree --- one step at a time. I am doing things on the trailers that I never had any experience with before. Started with my classic motorhome. I was a total newbie.
|
|
|
|
|
12-24-2010, 03:32 PM
|
#124
|
Rivet Master
1973 27' Overlander
Loganville
, Georgia
Join Date: Nov 2007
Posts: 1,741
|
I am putting a stainless steel Morinco marine outlet in. Here's how it has been going. I wire the outlet, plug it in and it works. I screw the outlet onto the trailer and it throws a breaker switch. I repeat this like six times. There aren't any exposed wires to create a short. Once I take the screws out and let it hang down it works after I set the reset. Once I attach it to the trailer it throws the reset. The reset on my wall outlet in my garage the trailer is plugged into trips. I gave up and I will go after it again on another day.

Brian
__________________
Brian & Adrienne
|
|
|
|
|
12-24-2010, 04:25 PM
|
#125
|
|
Restorations done right
Commercial Member
1962 26' Overlander
1961 26' Overlander
Vintage Kin Owner
Currently Looking...
Baltimore
, Maryland
Join Date: Aug 2007
Posts: 5,545
|
There is one little strand of wire.
It is hiding from your eye.
It is grounding out.
Find it.
|
|
|
|
|
12-24-2010, 05:05 PM
|
#126
|
Rivet Master
1973 27' Overlander
Loganville
, Georgia
Join Date: Nov 2007
Posts: 1,741
|
I am also going to take my power supply cord apart. I built it and there might be a wire grounding it out.
Brian
__________________
Brian & Adrienne
|
|
|
|
|
12-25-2010, 04:39 PM
|
#127
|
Rivet Master
1966 26' Overlander
Woodstock
, Georgia
Join Date: Feb 2002
Posts: 8,525
|
I am watching as I want to do that also
|
|
|
|
|
12-25-2010, 06:17 PM
|
#128
|
Rivet Master
1973 27' Overlander
Loganville
, Georgia
Join Date: Nov 2007
Posts: 1,741
|
I talked to my brother inlaw on the phone. He has built many a house and he knows electrical. He thinks I have the wires back wards. The wire they used on my trailer for the outside power supply outlet was lamp cord. It is not color coded. I thought the wire was on correctly but there is no real way of telling unless you pull it through and follow it.
I have the correct wire and that they use for houses. It has a green, black and a white wire. I am going to rewire everything tomorrow and see what happens.
Brian.
__________________
Brian & Adrienne
|
|
|
|
|
12-29-2010, 06:50 AM
|
#129
|
Rivet Master
1973 27' Overlander
Loganville
, Georgia
Join Date: Nov 2007
Posts: 1,741
|
I am heading out to pick up a multimeter because I have to find the short.
I had a friend stop by who is pretty good with fixing things and we tried to solve the problem. I redid the ground. I used another wire from left over electical wire. If you look at the picture we think it was grounded to the box somewhere. The ground was bolted to the side of the inner wall inside the closet and detached at the box. Previous owner had two twisted wires tied together to give the ground length. I made a solid temporary wire for the ground. Not sure where to attach to the box.
The temporary ground is that long yellow wire you see in the picture.
The power works when I let the outlet hang but as soon as I try to screw the outlet to wall it touches the aluminum panel and throws the reset in the house. Check out the pictures please. If you can give me an idea where I put the ground in the box please tell me.
Our electrician is down with bronchitis and he can't make it over.
Brian
Brian
__________________
Brian & Adrienne
|
|
|
|
|
12-29-2010, 11:14 AM
|
#130
|
Rivet Master
1974 Argosy 26
Morrill
, Nebraska
Join Date: Nov 2009
Posts: 6,014
|
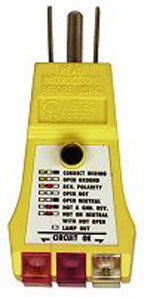
The first thing I would do is go to Home Depot or Lowes and pick up a circuit analyzer (see below). Not very expensive. You plug it into the outlet that your trailer cord is plugged into (at the house). It has multi colored lights that will indicate the status of the circuit. The one I use is a model HGT-120A "STOP SHOCK". It will identify most (but not all) problems.
The next thing is to get a proper cord commonly refered to as "A Shore Power Cord" and the proper outlet for the side of the trailer as well as the house.
The first thing I noticed when looking at the photo of the panel is the ground (bare wires) and neutral (white wires) are connected to the same buss. This is not correct. The neutral wires should be connected to a separate buss that is not grounded. The bare wires connect to a buss that is grounded to the box and there is a ground wire attached to the buss (usually a green or bare wire) that is connected to the receptacle on the side of the trailer.
You need to correct these items first.
I believe the reason you are tripping the breaker in the house panel is the "HOT" and the "NEUTRAL" are reversed. Since the neutral is connected to the ground buss. It is a direct short.
Your friend with electrical experience will understand what I'm talking about.
Here are a couple of websites that will help you out.
www.dasplace.net Go to the section RV Wiring
www.myrv.us Go to the "electrical Service section" then click on 30 amp. Check out the 30 amp outlet tester section here as well.
If you plan to travel and use RV park facilities. The trailer should be wired as such.
|
|
|
|
|
12-29-2010, 12:05 PM
|
#131
|
Rivet Master
1974 Argosy 26
Morrill
, Nebraska
Join Date: Nov 2009
Posts: 6,014
|
Once you have determined that the house outlet is wired correctly and the shore power cord is also wired correctly, you could make the following changes.
Until you can get another multi screw buss to use for the neutral. You could make a temporary wiring change and I mean temporary. Make sure that the power is OFF.
Then disconnect all of the white wires from the ground buss. Including the one that comes in from the marine receptacle on the side of the trailer. Then connect them all together with a wire nut. Make sure they don't touch a ground (bare) wire or the box. Leave all of the bare wires connected to the ground buss and connect any that are hanging free; there should be one bare wire going to the skin of the trailer and the ground wire from the marine receptacle as well.
Here are a few questions for you:
Do you know how to use a multi meter?
What size are the breakers in the trailer panel? "Top" "Bottom left and right"?
What size is the "romex" house wire? Identify all of them.
If you are going to install the 30 amp circuitry for trailer power, the wire between the marine receptacle and the panel should be #10. The shore power cord should be #8; to compensate for voltage drop. Most are #6.
Does the marine receptacle have a 30 amp rating?
Are the screws on the back of the marine receptacle different colors? If so, the BLACK wire on the shore power cord goes to the GOLD screw; The WHITE wire on the shore power cord goes to the SILVER screw and the GREEN wire goes to the GREEN screw.
|
|
|
|
|
12-29-2010, 12:30 PM
|
#132
|
Rivet Master
1973 27' Overlander
Loganville
, Georgia
Join Date: Nov 2007
Posts: 1,741
|
TG:
Thanks for the info. I will make those changes and post back what the results are.
Brian
__________________
Brian & Adrienne
|
|
|
|
|
12-29-2010, 12:33 PM
|
#133
|
Rivet Master
1974 Argosy 26
Morrill
, Nebraska
Join Date: Nov 2009
Posts: 6,014
|
I just notice another thing. It looks like the "ground buss" has a black insulator behind it. If so; there should be a "BONDING" screw thru the buss to the metal box. Which makes this the ground buss. If this is the case, once you get another buss block, you could change the function of this block to the neutral buss by removing the "BONDING" screw. Then the new buss block would become the ground, since it probably will not have an insulator.
Just remember that the bare wires go to the ground buss and the white wires go to the neutral buss which is NOT grounded.
Your brother in law should know what I'm talking about.
Another thing! All of the wires should go thru the holes in the side of the box and be fastened with the proper strain relief (box connector) like the one on the white wire with the 2 screws.

|
|
|
|
|
12-29-2010, 01:40 PM
|
#134
|
Rivet Master
1973 27' Overlander
Loganville
, Georgia
Join Date: Nov 2007
Posts: 1,741
|
TG.
Thanks a bunch with your directions and a buddy giving me the lay manterms for bus and other cal vocabulary I got it working. Thanks a bunch It works well. '
Brian
__________________
Brian & Adrienne
|
|
|
|
|
12-29-2010, 02:02 PM
|
#135
|
Rivet Master
1974 Argosy 26
Morrill
, Nebraska
Join Date: Nov 2009
Posts: 6,014
|
Glad I could Help. 
|
|
|
|
|
12-31-2010, 02:29 PM
|
#136
|
Rivet Master
1973 27' Overlander
Loganville
, Georgia
Join Date: Nov 2007
Posts: 1,741
|
Today I fitted the water heater. I have a few things to figure out, but I will get it done. I thought it would go smooth but it took me all day to get where I am. I have my patch for the water heater. It will come through this patch and I cut out the door for the old chimney. Long day but I am moving forward.
I posted this under water heater with a pic.
http://www.airforums.com/forums/f445...tml#post932202
Brian
__________________
Brian & Adrienne
|
|
|
|
|
12-31-2010, 05:25 PM
|
#137
|
Rivet Master
1959 26' Overlander
Nowhere
, Washington
Join Date: Dec 2008
Posts: 573
|
Brian, a couple months back I said I was about to do my furnace install and would tell you how it worked out. Well, I finally got around to it. Here is what my setup looks like. I will be running two 4" lines towards the rear. In the first photo you can see the old vent holes for the NT-22 that was there when I bought the trailer. Unfortunately, I couldn't reuse those because it put the new furnace too close to the kitchen cabinet to run the duct work. I moved it over a bit and will have to patch the old holes and add new ones  I installed the furnace about 2 inches above the floor to allow it to go over the c-channel.
Norm
|
|
|
|
|
12-31-2010, 05:30 PM
|
#138
|
Rivet Master
1973 27' Overlander
Loganville
, Georgia
Join Date: Nov 2007
Posts: 1,741
|
Norm:
Now I know why there was a 2" piece of wood under my old furnace. I have a NT 30 and will install it as soon as I finish the hot water heater. My old furnace had a totally different type of exhaust. I am making a patch to cover the hole and I will put two new holes in. I plan On building a cabinet over mine. It will be a bench to sit, but it will have my radio and tv electronics in there. It is still in the planning stage.
Your floor and furnace look great. My floor is in boxes in my garage.
Brian
__________________
Brian & Adrienne
|
|
|
|
|
01-01-2011, 10:59 AM
|
#139
|
Rivet Master
1973 27' Overlander
Loganville
, Georgia
Join Date: Nov 2007
Posts: 1,741
|
I decided to remove the Galley. I am going to remove and really get it clean back there and fix some vaneer. I got all the screws out of the floor and the wood wall. It seems to be held by screws in the back where you can't get to. They are running along the back wall. How do I detach the galley from the aluminum wall. I got the aluminum piece from under the galley by the stove. How do you get the counter top to come off?
Brian
__________________
Brian & Adrienne
|
|
|
|
|
01-01-2011, 11:32 AM
|
#140
|
Rivet Master
1959 26' Overlander
Nowhere
, Washington
Join Date: Dec 2008
Posts: 573
|
Mine was attached with about four or six (can't remember the exact number) screws coming up through the framing from below. The screws that go through the aluminum cove molding along the wall and the bulkhead go all the way through the countertop and into the framing below. The screws that hold down the rear cove molding (along the wall) go into a strip of 1 x 2 that is screwed to the wall but not attached to the cabinet. Mine also had two or three screws that went through the toe kick down into the floor of the trailer. Those were the most difficult to remove as they are deeply countersunk, rusty, covered with dust etc and they are large slot head screws. If you strip the head, you will have to sneak a sawzall blade under the cabinet and cut the screw.
|
|
|
|
|
|
|
Currently Active Users Viewing This Thread: 1 (0 members and 1 guests)
|
|
|
 Posting Rules
|
You may not post new threads
You may not post replies
You may not post attachments
You may not edit your posts
HTML code is Off
|
|
|
|

 Recent Discussions
 |
|
|
|
|
|
|
|
|
|
|
|
|
|
|
|
|
|
|
|
|
|


 Linear Mode

