 |
|
 04-19-2017, 05:10 AM
|
#681
|
2 Rivet Member 
1967 22' Safari
1966 24' Tradewind
Columbus
, Ohio
Join Date: Nov 2015
Posts: 92
|
Shelly, you don't have to pull the new fresh water tank.
Just add the water filter before the pump. Easy-ish fix.
|

|

|
|
04-19-2017, 09:26 AM
|
#682
|
4 Rivet Member 
Vintage Kin Owner
Superior
, Colorado
Join Date: May 2014
Posts: 442
|
Quote:
Originally Posted by reinergirl

Camping is def in the plans! Especially since we will have water, i.e. hot showers soon! Gosh after like 4 years I will have a working stove AND a hot shower!
|
I'm two years in and am just starting to wire the inside! AND the outside still needs work!
Sigh.
__________________
1972 33' Streamline Emperor Crown Imperial
1949 30' Spartan Royal Mansion
2012 Nissan Armada
Most of China
|
|
|
|
|
04-21-2017, 03:21 PM
|
#683
|
|
Site Team

1963 26' Overlander
Hollis
, New Hampshire
Join Date: Oct 2009
Posts: 2,647
|
Not just a curtain!
I have another post started with a bunch of fun details that are getting knocked off while I wait for cabinets to dry and such, but I thought this item was special enough that it deserved its own post.
Who'd u thunk that a shower curtain would evolve into a major project? ME! Raising my hand!! Because I don't do ordinary well..... OBVS. Hello, have you caught onto me yet? Yes, I could have thrown up the old shower curtain track, (I can't believe I actually held onto that grungy piece of plastic this long just in case my idea didn't work! You want it? It's yours for shipping....) and I also could have bought a ready made curtain and cut it down. However, I saw this curtain at Anthropologie a year ago and fell in love with it.
I pinned it ( Pinterest is soooooo evil, it makes me do things....) Here's my version. UGH I wish I had ironed it before I took this pic. Imagine it ironed folks! 
Did I make all those tassels by hand?  YEP! I used embroidery thread in the same colors as the pendleton blankets (cause matching counts, LOL). The fabric is just a duck type canvas. I added three rows of horizontal pleats so I'd have something sturdy to attach the tassels to and hide all the knots underneath.
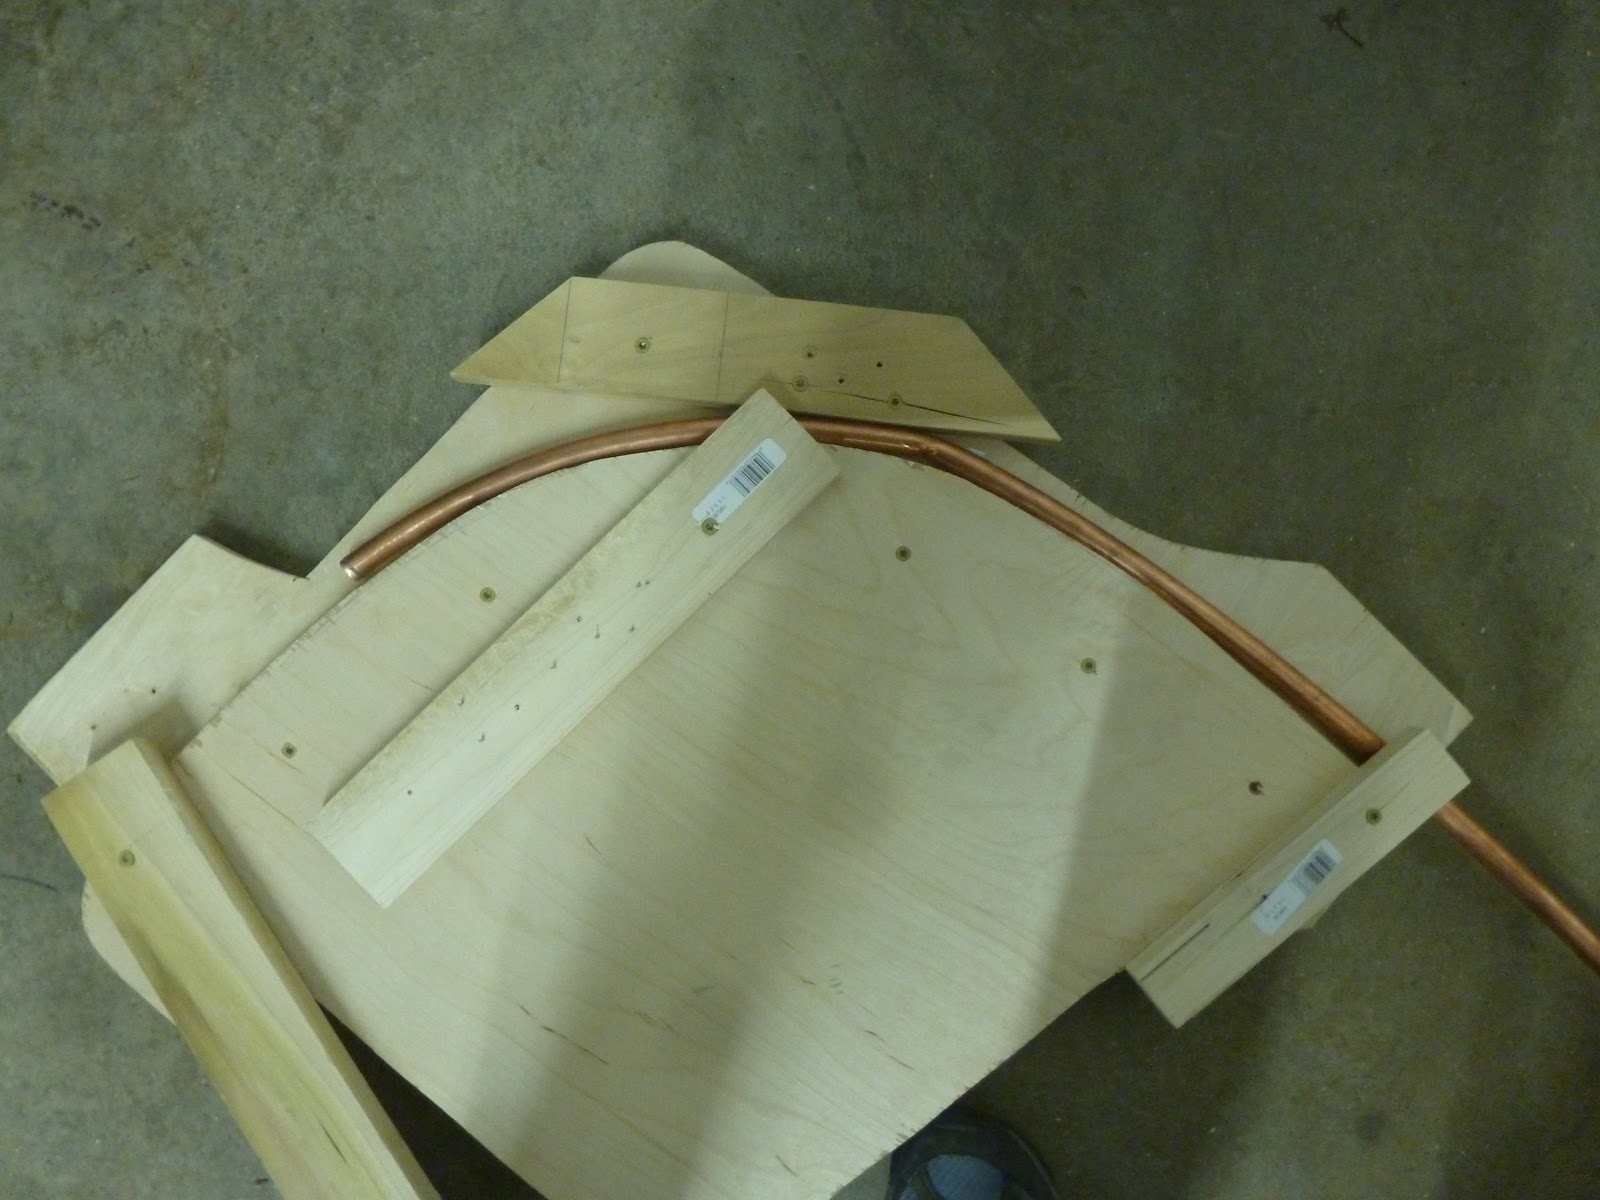
The shower curtain rod I bent out of 1/2 inch copper pipe. I made a jig like this that followed the curve of the tub.
The first time I tried to bend the pipe, I filled the it with sand that was a maybe little too coarse and there were some voids (or I got a little too aggressive) and the pipe kinked. DANG! 
The second time I filled it with salt (yes, I washed it out really well after) and it worked like a charm. The pipe actually bent pretty easily. I used copper bell hangers to attach it to the wall . Where it attaches to my copper covered wood bulkhead wall I bolted it through with a fender washer on the other side. Attaching to the fiberglass endcap was a little trickier because I was afraid it would pull out. I ended up epoxying a circle of aluminum to the fiberglass, reinforcing it with a few rivets and then screwing the bell copper hanger through that.
I thought I might have to extend a support from the ceiling but with the three hangers it seems secure enough. No monkey bar swinging on it but ...
Rear mount with a 90 degree fitting and a small straight run of pipe
Front mount bolted thru wall. with a 45 degree fitting and another small straight return
I tried E6000 glue for the fittings but it didn't work. I then used some Gorilla Glue clear 5 minute epoxy which did the trick!
The copper hooks were actually fun to make, I built another jig. Drew the basic shape I wanted with a sharpie on a scrap piece of wood, drilled two holes with a forstner bit, added a couple of pieces of a 1/2 inch wood dowel and voila! I bought 8 gauge copper grounding wire from a big box store for the actual hooks. Bolt cutters to cut, and a dremel with a grinding bit to burnish up the ends . Pretty simple and about $5 in materials.
I even figured out if a hang a few hooks backward they can be used as towel hangers! Sweeeet. 
I liked this shower curtain so much I made a room divider just like it #totallysickofmakingtassels.  It's on a spring curtain rod so we can use it to cordon off the bath area or use it up front when I want to read and my husband wants to sleep. I'm kinda a night owl! Yes, my tub is on the bed, it's a work in progress, deal with it!
In other matters, my kitchen cabinet/counter is coming along nicely. And we've started the fresh water plumbing which is beyond exciting. A couple of fast questions for you all. How do I secure the fresh water tank to the floor? I have VERY limited space.
And where do I put the fresh water campground intake faucet? Point me to your pictures of such. I'm assuming in the back left belly pan area?
Lots more to come soon I promise! Save
Save
Save
__________________
Shelly : TAC NH-6 | AIR 41359
Visit my blog!
Parts needed : Braund Antenna front tube fold down model! 
|
|
|
|
|
04-21-2017, 06:04 PM
|
#684
|
Rivet Master 
1991 34' Excella
1963 26' Overlander
1961 26' Overlander
Central
, Mississippi
Join Date: Nov 2006
Posts: 5,919
|
A 1963 Overlander named Moonraker!
Nice looking work. I'm going to use shower curtains also in a new project. My water inlet is next to the WH, lots of pipe already in the area so hookup was easy.
|
|
|
|
|
04-21-2017, 06:55 PM
|
#685
|
Rivet Master
1959 26' Overlander
Western
, Massachusetts
Join Date: Sep 2005
Posts: 1,468
|
Too dark to take a pic right now, but mine is just like Vernon's -- probably 6-8" lower. I have it just at floor level, with a ball valve mounted just inside, secured to the floor. That valve isolates the city supply from the water tank and is also one of my low point drains for winterizing.
Great work as usual -- can't wait to see it again in person!
John
|
|
|
|
|
04-21-2017, 08:29 PM
|
#686
|
Rivet Master
1964 17' Bambi II
Vintage Kin Owner
Schererville
, Indiana
Join Date: Jul 2005
Posts: 2,637
|
We used strapping that is used in plumbing to secure our tank to the floor. It comes in a roll & has holes every 1/2" or so. Looking great!
__________________
Becky
1964 Bambi II
1988 Avion 32S
|
|
|
|
|
04-23-2017, 07:30 PM
|
#687
|
|
Site Team
1963 26' Overlander
Hollis
, New Hampshire
Join Date: Oct 2009
Posts: 2,647
|
Quote:
Originally Posted by HiHoAgRV
Nice looking work. I'm going to use shower curtains also in a new project. My water inlet is next to the WH, lots of pipe already in the area so hookup was easy.
|
Thanks Vernon and John  I don't have anything in that area, the Bowen heater is gone (that whole side was a panel replacement). And the new heater vents under the trailer. As the water inlet would be the only thing in that area, it would stick out like a sore thumb.
I'm thinking of putting it in the belly pan near the grey tank valterra valve .... means l'm going to be crawling under the trailer to attach the hose but I'm putting in one of these and I think it's ugly. Trying to hide it. 
 http://www.vintagetrailersupply.com/...-p/vts-621.htm
Any other ideas?
__________________
Shelly : TAC NH-6 | AIR 41359
Visit my blog!
Parts needed : Braund Antenna front tube fold down model!
|
|
|
|
|
04-23-2017, 07:39 PM
|
#688
|
|
Site Team
1963 26' Overlander
Hollis
, New Hampshire
Join Date: Oct 2009
Posts: 2,647
|
Quote:
Originally Posted by Becky B.
We used strapping that is used in plumbing to secure our tank to the floor. It comes in a roll & has holes every 1/2" or so. Looking great!
|
You mean this stuff?
 http://www.homedepot.com/p/Perforate...-4HS/100396917
I was thinking this wouldn't be heavy duty enough, the water tank would hold about 230 pounds of water ( 28 gallons). Am I overthinking it again? 
__________________
Shelly : TAC NH-6 | AIR 41359
Visit my blog!
Parts needed : Braund Antenna front tube fold down model!
|
|
|
|
|
04-24-2017, 04:30 PM
|
#689
|
Rivet Master
1991 34' Excella
1963 26' Overlander
1961 26' Overlander
Central
, Mississippi
Join Date: Nov 2006
Posts: 5,919
|
I put wooden blocks on all 4 sides so the tank couldn't slide, all the straps have to do is hold it down. Even without straps it would take one heck of a bump to toss 200 lbs up and over the blocks.
|
|
|
|
|
04-24-2017, 04:40 PM
|
#690
|
Rivet Master
1959 26' Overlander
Western
, Massachusetts
Join Date: Sep 2005
Posts: 1,468
|
Quote:
Originally Posted by reinergirl
....
Any other ideas?
|
I don't like crawling underneath the trailer in bad weather. How about this instead?
|
|
|
|
|
04-24-2017, 07:58 PM
|
#691
|
Rivet Master
1964 17' Bambi II
Vintage Kin Owner
Schererville
, Indiana
Join Date: Jul 2005
Posts: 2,637
|
Quote:
Originally Posted by reinergirl
|
That's it...! I have filled mine & traveled several times without issue. Mine is a little over 20 gallons if I recall correctly.
__________________
Becky
1964 Bambi II
1988 Avion 32S
|
|
|
|
|
04-26-2017, 07:33 AM
|
#692
|
|
Always learning
1972 29' Ambassador
1962 19' Globetrotter
1951 21' Flying Cloud
Central
, Texas
Join Date: Oct 2010
Posts: 2,881
|
Quote:
Originally Posted by reinergirl
Thanks Vernon and John I don't have anything in that area, the Bowen heater is gone (that whole side was a panel replacement). And the new heater vents under the trailer. As the water inlet would be the only thing in that area, it would stick out like a sore thumb.
I'm thinking of putting it in the belly pan near the grey tank valterra valve .... means l'm going to be crawling under the trailer to attach the hose but I'm putting in one of these and I think it's ugly. Trying to hide it.
Attachment 283991
http://www.vintagetrailersupply.com/...-p/vts-621.htm
Any other ideas? |
Hi Shelly,
Those ShurFlo water inlets are weak. I used one and it worked for a while, but it leaks a little when the water pressure is higher than about 65psi. I would use something like 65CV suggested. Just about anything other than that ShurFlo!
Keep up the fine work! Lookin' superb!
__________________
Lance
Work is never done, so take time to play!
|
|
|
|
|
04-27-2017, 07:47 PM
|
#693
|
Rivet Master
1959 26' Overlander
Western
, Massachusetts
Join Date: Sep 2005
Posts: 1,468
|
I realized that I linked to the wrong one. Here is the one I used. I didn't like the idea of any moving parts on the trailer, so I put the male on the trailer. That way, if there is a leak in the moving cap for the female end, I don't need to replace the whole fitting -- I've done enough drilling, riveting, shaving, sealing!
I cut the male end off my hose and bought a good quality female hose repair kit and made a female-female hose that I use to hook up. If there are any leaks, they are on the hose, not the trailer.
BTW, this fitting is a lot cheaper. 
Let me know if you find a stainless cap that really camouflages the fitting. Somehow I know you'll find it before deciding to go this way.
|
|
|
|
|
04-29-2017, 02:16 PM
|
#694
|
Rivet Master
1963 26' Overlander
Austin
, Texas
Join Date: Feb 2008
Posts: 2,640
|
Quote:
Originally Posted by reinergirl
I have another post started with a bunch of fun details that are getting knocked off while I wait for cabinets to dry and such, but I thought this item was special enough that it deserved its own post.
Who'd u thunk that a shower curtain would evolve into a major project? ME! Raising my hand!! Because I don't do ordinary well..... OBVS. Hello, have you caught onto me yet? Yes, I could have thrown up the old shower curtain track, (I can't believe I actually held onto that grungy piece of plastic this long just in case my idea didn't work! You want it? It's yours for shipping....) and I also could have bought a ready made curtain and cut it down. However, I saw this curtain at Anthropologie a year ago and fell in love with it.
I pinned it ( Pinterest is soooooo evil, it makes me do things....) Here's my version. UGH I wish I had ironed it before I took this pic. Imagine it ironed folks!
Did I make all those tassels by hand? YEP! I used embroidery thread in the same colors as the pendleton blankets (cause matching counts, LOL). The fabric is just a duck type canvas. I added three rows of horizontal pleats so I'd have something sturdy to attach the tassels to and hide all the knots underneath.
The shower curtain rod I bent out of 1/2 inch copper pipe. I made a jig like this that followed the curve of the tub.
The first time I tried to bend the pipe, I filled the it with sand that was a maybe little too coarse and there were some voids (or I got a little too aggressive) and the pipe kinked. DANG!
The second time I filled it with salt (yes, I washed it out really well after) and it worked like a charm. The pipe actually bent pretty easily. I used copper bell hangers to attach it to the wall . Where it attaches to my copper covered wood bulkhead wall I bolted it through with a fender washer on the other side. Attaching to the fiberglass endcap was a little trickier because I was afraid it would pull out. I ended up epoxying a circle of aluminum to the fiberglass, reinforcing it with a few rivets and then screwing the bell copper hanger through that.
I thought I might have to extend a support from the ceiling but with the three hangers it seems secure enough. No monkey bar swinging on it but ...
Rear mount with a 90 degree fitting and a small straight run of pipe
Front mount bolted thru wall. with a 45 degree fitting and another small straight return
I tried E6000 glue for the fittings but it didn't work. I then used some Gorilla Glue clear 5 minute epoxy which did the trick!
The copper hooks were actually fun to make, I built another jig. Drew the basic shape I wanted with a sharpie on a scrap piece of wood, drilled two holes with a forstner bit, added a couple of pieces of a 1/2 inch wood dowel and voila! I bought 8 gauge copper grounding wire from a big box store for the actual hooks. Bolt cutters to cut, and a dremel with a grinding bit to burnish up the ends . Pretty simple and about $5 in materials.
I even figured out if a hang a few hooks backward they can be used as towel hangers! Sweeeet.
I liked this shower curtain so much I made a room divider just like it #totallysickofmakingtassels. It's on a spring curtain rod so we can use it to cordon off the bath area or use it up front when I want to read and my husband wants to sleep. I'm kinda a night owl! Yes, my tub is on the bed, it's a work in progress, deal with it!
In other matters, my kitchen cabinet/counter is coming along nicely. And we've started the fresh water plumbing which is beyond exciting. A couple of fast questions for you all. How do I secure the fresh water tank to the floor? I have VERY limited space.
And where do I put the fresh water campground intake faucet? Point me to your pictures of such. I'm assuming in the back left belly pan area?
Lots more to come soon I promise! Save
Save
Save |
Love the shower curtain rod idea, I still haven't really addressed that in mine.
My 63 has a hinged aluminum door on the street side under the galley window where there's a panel that has both the pressurized campground water hookup, as well as the external tank fill port. I guess I assumed this was the norm but perhaps it's aftermarket? Anyway, it works well for me, and no sliding around on the ground.
And my freshwater tank is just held by blocks at each corner, no straps or anything to hold it down. It's never been an issue and believe me, with my horribly frozen axles and extremely rough ride, I would have discovered by now if it were an issue.
Anyway, progress looks great, keep it up!
-Marcus
|
|
|
|
|
06-26-2017, 05:12 PM
|
#695
|
|
Site Team
1963 26' Overlander
Hollis
, New Hampshire
Join Date: Oct 2009
Posts: 2,647
|
Had to say goodbye last night to this sweetheart and fellow airstreamer.
RIP Maggie, you've left a huge hole in our hearts.


__________________
Shelly : TAC NH-6 | AIR 41359
Visit my blog!
Parts needed : Braund Antenna front tube fold down model!
|
|
|
|
|
06-26-2017, 05:39 PM
|
#696
|
Rivet Master
2012 27' Flying Cloud
W
, New England
Join Date: Oct 2012
Posts: 7,402
|
Quote:
Originally Posted by reinergirl
|
Oh I'm sorry for your loss. Maggie looks like the sweetest of traveling buddies.
|
|
|
|
|
06-26-2017, 08:20 PM
|
#697
|
3 Rivet Member 
1957 26' Overlander
Los Angeles
, California
Join Date: May 2004
Posts: 135
|
Condolences to you and your family [emoji22]
|
|
|
|
|
06-26-2017, 08:39 PM
|
#698
|
4 Rivet Member
1962 22' Safari
1973 25' Tradewind
1968 30' Sovereign
Salt Lake City
, Utah
Join Date: Apr 2007
Posts: 264
|
So sorry. One of the worst things in my opinion.
|
|
|
|
|
06-26-2017, 11:02 PM
|
#699
|
Rivet Master
2007 22' International CCD
Corona
, California
Join Date: Jul 2013
Posts: 9,180
|
Two losses in the past year here. I know how you feel. Sympathy...
__________________
Rich, KE4GNK/AE, Overkill Engineering Dept.
'The Silver HamShack' ('07 International 22FB CCD 75th Anniversary)
Multiple Yaesu Ham Radios inside and many antennae sprouting from roof, ProPride hitch, Prodigy P2 controller.
2012 shortbed CrewMax 4x4 Toyota Tacoma TV with more antennae on it.
|
|
|
|
|
06-27-2017, 05:52 AM
|
#700
|
2 Rivet Member
1967 22' Safari
1966 24' Tradewind
Columbus
, Ohio
Join Date: Nov 2015
Posts: 92
|
Godspeed
So, so sorry for your and your family's loss.
|
|
|
|
|
|
|
Currently Active Users Viewing This Thread: 1 (0 members and 1 guests)
|
|
|
 Posting Rules
|
You may not post new threads
You may not post replies
You may not post attachments
You may not edit your posts
HTML code is Off
|
|
|
|

 Recent Discussions
 |
|
|
|
|
|
|
|
|
|
|
|
|
|
|
|
|
|
|
|
|
|


 Linear Mode

