 |
|
 10-20-2006, 06:40 PM
|
#1
|
3 Rivet Member 
1964 26' Overlander
Alameda
, California
Join Date: Sep 2006
Posts: 161
|
1964 Overlander, San Leandro, California
Hello, I think this is my first forum post here, although I've been mining for information for a while...
I just bought a 1964 Overlander having wanted an Airstream for 10 or 15 years now, even before I moved to the US from England about 7 years ago - they're pretty famous there too. I'm very happy to have it, and of course it needs some work, so here we go. I got it in Texas and drove it back to San Leandro, California last weekend - 1,500 miles or so - and right now it's parked at my friend's house down there, as I live about 20 miles away in Oakland (they are tolerant... for now). I'm planning to move to a place in San Leandro with a driveway & garage so I can work on it at home. I have a driveway at my current place in Oakland, but it's narrow, steeply-sloped, has low tree branches, and my street is also narrow, steeply-sloped, and a dead end. I still act like I live in San Francisco (lived there for 5 years), but as I move further & further from the city it's getting harder to pull that off...
Here's some pictures of the trip back from Texas:
http://flickr.com/photos/jacob-davie...7594332403020/
A few of those that I really like-
Airstream in the dark:

Sunset clouds in California:

Red:
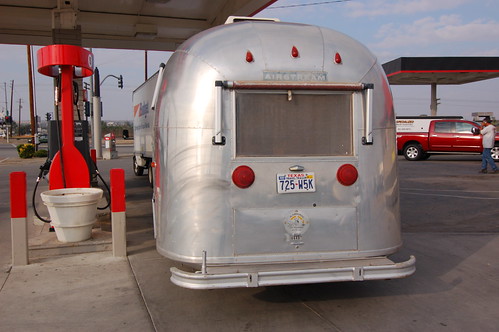
I towed it back with a 15' rental truck, which was cheap ($200) and worked out pretty well - the hitch was a little high, but I think I only scraped the tail of the trailer once and no permanent harm seems to have been done. There was a bit of a shock when my careful research had indicated that the trailer would have a 2" coupler (as the truck had a 2" ball) and then the seller said, oh no, it has a 1 7/8 coupler. I got as far as buying a new 2" coupler and finding somebody to weld it on - not all that easy on a Saturday afternoon in small-town Texas - before we got to the trailer and found out it was a 2" coupler after all. The seller was very apologetic but I was just glad we didn't have to do any cutting & welding before we left. I wired a 7-pin connector to the trailer lights connector on the back and a brake controller I temporarily installed and everything worked great. The wheels are split-rims still, I think, but the tires were pretty good, and the brakes worked fine.
Driving back was really fun, even though the trailer wasn't providing much in the way of amenities, there was no sway control, and we had some exciting moments in high winds on 58 coming across Southern California. Oh yeah, and there was that time we followed a bad sign trying to find a gas station and had to back the truck 1/4 mile down a curving hillside road. In the dark. Hey, it was good practice at backing - I'd never driven with a trailer before, but I think I got the hang of it pretty quickly. (The guy at the gas station said, "Yeah, that sign is confusing. I wonder why only people with big trailers come here and complain about it though?" - the idea that everyone else can just TURN AROUND when they hit the unpaved section had evidently not occurred to him, nor the idea that maybe the sign should be fixed...)
But anyway, every time we stopped for gas (which was regularly...) I got to admire the trailer, and I just loved parking it across 7 spaces at restaurants and so on - somehow everyone loves the Airstream, I think you could get away with murder with one.
The previous owner had it from his grandfather, and the trailer had been in Alamagordo, New Mexico until 2003. The grandfather had kept it polished at least until the 80s, and from what I can tell it was still being kept up until the 90s. The guy selling it was sad to see it go, but he needed to tow some kind of racecar or bike in a trailer and the Airstream wasn't really compatible. So, I'm pretty hopeful that being stored in NM and being kept up by a diligent owner means no serious rust or rot problems being left to get out of control. So far what I'm seeing seems to confirm that.
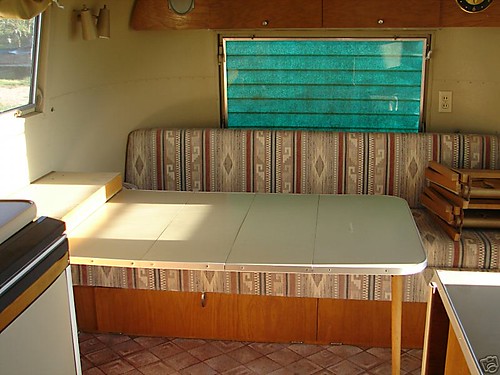
So, the details; it's a 1964 Overlander, double-bed layout. The interior is mostly original except that the back fold-out bed has been replaced with a fixed bed. The cooker and refrigerator have been replaced at some point (1970s or 1980s, it looks like to me). The tile floor had carpet laid over it. It had air conditioning either added or replacing the factory system at some point, and a circular TV antenna added on the roof. It has awnings but they're not Zip-Dee. The furnace seems to be gone (assuming there was one) and a gas fireplace put in instead. The water heater was replaced at some point. The rear window has been replaced with plexiglass, now clouded.
Everything else is pretty much original - the bathroom, the front bed/couch, the reading lights, ceiling vents, astradome, the outside TV and radio antenna on the front, all the high cabinets, the kitchen, pantry, wardrobe, dresser, and all of the storage trays are still there, although a few of them have some damage or fiberglass repairs.
The outside skin is near perfect:

There's one large patch behind the door on the curb side:

And another where the new water heater is:

Here's some overview photos of the inside:


I'll post a followup with what I think needs work and my plan for getting it the way I want it...
|

|

|


|
10-20-2006, 07:23 PM
|
#2
|
3 Rivet Member
1964 26' Overlander
Alameda
, California
Join Date: Sep 2006
Posts: 161
|
So the current state of the trailer is, I think, pretty good. There's obviously been some leaks over the years - some delamination of the cabinets over the back bed indicates that, and the duct tape around the fiberglass wheel well covers:

But the floor seems sound almost throughout - admittedly, it still has the tiles down over most of it, but where I have pulled them up it is dry and solid. The wheel well leaks I hope to address by cleaning the wells & patching or repainting or otherwise treating them to seal them.
The one problem area is under the jalousie window next to the door, around the right edge of the couch. The floor there seems solid still, but the skin seems to have pulled away from it a bit, and been patched & screwed back on. For some reason that's the one thing I don't have any photos of right now, I'll get some... I'm thinking stresses from stepping into the trailer caused perhaps a bend in the frame.
The other symptom that I think is related is a crack in the interior and exterior skin going up from the doorframe. It's about 5 inches long - I have a feeling what's happened is that the floor is pulling the skin down by the door and cracking it. Perhaps the step is failing or the outrigger it's attached to is bending. I'll probably cut into the belly skin there to take a look, or else cut out that section of floor. I'm hopeful that's a minor problem.
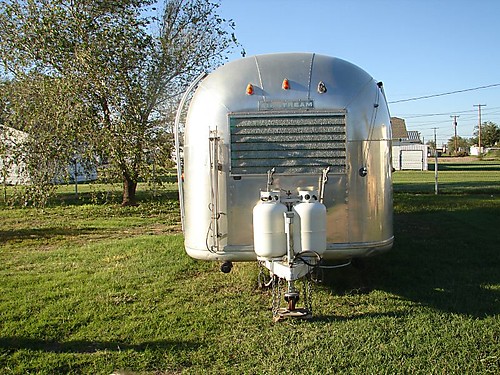
The external parts of the frame have surface rust:

but I'm hoping that it's superficial and that using some POR-15 and repainting will take care of it.
The belly skin seems almost entirely sound and in great shape, so I am hoping too that the frame inside is in good shape. I guess when I look inside the step area I'll get a better idea of that. Hoping hoping hoping not to have to drop the belly skin to take care of the frame - I know it's probably full of wasp's nests & mice in there, but as long as it's structurally sound I operate under the principle of what you don't know, won't hurt you.
The awnings are not very good - the hardware may be salvageable, the fabric (actually more like tarp material) is not. And the street-side awning started coming unfurled in high winds on the highway - not good! So I think I'm going to remove them and patch the holes left, at least for now. To cut down on solar heating I think I'm going to have the windows tinted with R20 reflective film - I think it'll look good with the polished skin, and if not it can be removed anyway, or the glass replaced... If I desperately miss the awnings, I'll either get new fabric made for them and reinstall, or buy new Zip-Dee awnings.
Speaking of windows, the seals are completely shot on all of them except the front window, which was protected by the rockguard. That is job #1 before it starts raining again, and I have the stripping ordered from vintagetrailersupply. The window hardware though seems good. Needs greasing, but all the cranks work (some have been replaced) and all the screens are good, just dirty.
All the marker lights and the porch light lens need replacing - I have them on order too. The taillights are cracked, but workable. I'm not sure what kind they are:
http://flickr.com/photos/jacob-davies/274427817/
Dunno about the axles. Here's what they look like:

I don't know enough to judge whether they're any good. The shock absorbers are antique and presumably need replacing, and I don't know whether doing that will improve the axle angle or what. The brakes work well, although the wiring needs some work - they're connected with bare wirenuts hanging under the frame, not sealed in any way, yikes. Some better connectors and heat-shrink tubing seem to be called for, or maybe all-new wiring.
I was thinking I would replace the wheels with new steel wheels when the tires need replacing. The current tires look okay to me for a while though. I think I'm going to get chrome moon hubcaps that presumably would have been original.
On the interior, cosmetic stuff will wait until all the serious work is done, except that the fixed bed is coming out forthwith as it is hugely in the way and I'm not going to use it.
The electrical stuff all seems to work well - all the 12V lights work. The electric hitch jack needs rewiring. The battery is either dead or something is causing it not to charge, I think. Haven't tried any of the 110V stuff except the power converter and the fridge, which work fine.
Haven't tried any of the plumbing. Haven't tried any of the gas appliances. They're supposed to work and I don't see why any of them wouldn't. The gas heater/fire is going to go though.
So, my worklist by priority:
1) Repair all windows & window seals. I have the parts on order. Don't know if I will need to have the window frames welded, I hope not. While I have the windows out, get R20 glass tint applied, and replace the back window with glass.
While out, grease & check all the window opening & fastening hardware.
2) Check exterior for any other leaks. Probably when it rains this important task will be performed for me. Repair any that I find.
3) Wirebrush, treat, and repaint all exterior steel parts (frame, step, axles). Clean wheel wells and look for leaks. Patch & seal as needed.
4) Remove the fixed bed & dump it.
5) Order replacement cushions for the front couch/bed and either make or order replacement covers for them. I've decided to use the front bed as my actual bed - it's much less in the way when folded out than the back bed, and all you lose is a couch. I never sit on my couches anyway and when I have company I can fold the bed up if need be. Or they can just sit on the bed. The bed doesn't block the fold-out table, which for now at least I can use as a desk.
6) Figure out what's going on with the step area floor & doorway cracks, and repair it. This might involve removing the couch from the front and replacing some of the subfloor around there or doing some welding on the frame.
7) Replace shock absorbers, check brakes, regrease bearings, check tire pressures, if necessary replace wheels & tires, if necessary replace axles.
8) Plan & install new electrical and plumbing layout. This probably involves having a new greywater and perhaps freshwater tank fabricated, installing them, installing a sump pump, and replacing all the copper water lines with PEX. The exterior water fill valve looks like crap too, I think it needs to be replaced. Probably replace the water pump, keep the old one to use for a transfer pump.
9) At this point it should be completely usable, just sort of untidy inside.
-
Non-priority items that'll get done as I go along:
* Clean clean clean
* New nameplates
* New external marker lights
* New porch light cover
* New curtains or blinds for the windows
* Replace the two sliding divider vinyl curtains
* Remove excess sealant and decayed remains of stickers from the outside
* Remove & sell original TV antenna
* Remove & throw away modern TV antenna
* Replace conventional interior electrical fittings with new ones & stainless steel or nickel plates
* Remove awnings & hardware, measure then throw away fabric, store hardware
* Patch exterior holes no longer used
* Replace air conditioner with low-profile unit, spray-painted silver
* Replace the fiberglass rock guard with perforated aluminium
* Polish!
-
Things I hope I don't need to do but if I have to I will:
* Replace axles.
* More floor replacement than just around the door.
* Drop the belly skin & repair/repaint the frame inside, replace insulation.
* Remove the interior skin panels and replace.
* Remove interior cabinets to repair floor under them.
* Replace the toilet/black tank/sewer system. Ew.
-
After all the priority stuff is the fun stuff where I get to do the interior.
But really no use starting on much of that until all the important things
are taken care of. But I am thinking: keep the front bed/couch. Keep
the fold-out kitchen table. Keep the bathroom pretty much as-is,
although replace the ugly box cover that goes over the toilet with something
nicer looking. Keep the closet & dresser that are currently facing the
back bed. Tear out the back bed and re-use that space, probably for a
desk & other things.
Keep the sink/cooker side of the kitchen but replace the cooker with a
smaller cooktop & microwave underneath, replace the sink with a smaller
one to free up some counter space for important things like my Dualit toaster
and an espresso machine. Replace the countertop too, probably with
a wooden one (I do like the formica, but I don't love it). On the other
side, replace the fridge with a taller one with a separate freezer; keep
the cabinets next to it, but extend it upwards and put a small built-in
dishwasher above it. That loses a bunch of counter space but I don't
care about that. It'll probably create some more cabinet space in the
process.
Probably sand & repaint the interior. The beige flecked Zolatone is all very
original & stuff, but it's also kind of hideous. Maybe replace some of the
nterior wall panels behind the sink & cooker with stainless steel or copper.
Next up, Mysterious Mysteries Of Things Installed By The Previous Owner That I Don't Understand...
|
|
|
|
|
10-20-2006, 07:34 PM
|
#3
|
3 Rivet Member
1964 26' Overlander
Alameda
, California
Join Date: Sep 2006
Posts: 161
|
Gas heater that was screwed onto hinges on the sink cabinet:

Water lines that go up on either side up to near the roof, inside the cabinets:

These are on both sides, about where the front vinyl curtain is separating the bedroom from the kitchen. There are holes drilled in the cabinets that would let them extend out towards either each other, or maybe the air conditioner (but there's nowhere for them to connect to the air conditioner). They both go down into the floor and I don't know where after that... I guess I'll find out if they're connected to the pressurized water system the first time I try to use it, huh?
Three vent pipes - one coming up from the black water tank, presumably, that kinks through the back closet in the bathroom:

One coming up on the other side, from the side of the shower tub:

And one coming up above the cooker, roughly:

Is that normal? They all seem to be made of fairly recent PVC pipe and none of them seem to have metal vent pipe covers.
And finally a vent in the belly skin under the fridge - is this original?

Oh yes, and you can also see there one of the two large PVC pipes with caps that are attached to the belly skin. I haven't actually managed to get either of the caps off, but I suspect they contain awning poles for an add-on awning.
|
|
|
|
|
10-20-2006, 07:41 PM
|
#4
|
3 Rivet Member
2000 27' Safari
Berkeley
, California
Join Date: Mar 2004
Posts: 135
|
Welcome!
Hi Jacobwellcom,
Congratulations on your acquisition!
I, like yourself, educated myself through the forums, purchased my trailer out of state (New Mexico), and towed it home to the Bay Area (currently resides in Alameda). What a sweet trip that was! You learn quite a bit about your trailer, towing dynamics, and have a hard time not looking in the mirror at your unit. I hope to, eventually, move my trailer to my driveway in the Berkeley Hills so I can look at it every day. Unfortunately, I am now limited to weekends only! 
I appears you acquired a very nice trailer indeed. Best of luck, and keep us updated on the journey.
You may wish to check out the proposed Four Corners Unit of the WBCCI... good people and the right attitude.
__________________
'00 Safari 27' Rear Twin
'03 Ford F-250 7.3TD/CC/LB 4x2 Bio-Diesel
"Hmmm... Smells like French Fries!" 
Prodigy/Enkay/Hensley/Solar/LED lighting
AIR 4598 / WBCCI FCU 8579/
EAA 872814
|
|
|
|
|
10-20-2006, 07:52 PM
|
#5
|
Rivet Master 
Currently Looking...
West of Fort Worth
, Texas
Join Date: Aug 2006
Posts: 6,699
|
Hey, nice trailer - welcome to the forums.
The PVC pipes under the trailer probably house your sewer connection hose.
The propane heater is a catalytic heater and something you should keep if it works OK. If not I'll buy it from you for the right price. 
Dave
|
|
|
|
|
10-20-2006, 07:56 PM
|
#6
|
3 Rivet Member
1964 26' Overlander
Alameda
, California
Join Date: Sep 2006
Posts: 161
|
Couple of other things - the front rockguard is fiberglass but very rough:
Lots of fibers coming off. The window underneath is flat, although the cover is ridged. I think I'm going to replace it with a sheet of perforated aluminium, although I'll probably sell the original on ebay if someone could use it for a restoration. The new one will be heavier but I can beef up the supports, I think.
I think for the electrical system, I will install one or two large AGM batteries (at the front or over the wheels, not in the back compartment) and probably a Xantrex Prosine 2.0 inverter/charger.
There's no grey water tank, and since I hopefully am not going to need to pull up the floor I was thinking I would have one fabricated that may go over the left-side wheel wells - possibly inside the cabinets next to the fridge, replacing the storage there, or behind the pantry where the fixed bed is now. To get the water into it, I was thinking an automatic marine sump pump at the back end would work, so the sinks & shower would get pumped right back to the grey tank. I may move or replace the freshwater tank too, as it's currently taking up some prime flat-floor real estate under the fixed bed that I may want for a desk.
Oh yeah, and at some point I probably need a tow vehicle, huh? I think initially I will buy a 10-ish year old F150 or RAM 1500. If I wind up towing a lot, I think I'll get a new truck - I haven't actually driven any yet, but the Nissan Titan seems like it could be a good match, or the new Tundra that's coming out next year. On the other hand if I need something bigger, either a RAM 2500 or the new F250 that's coming next year seem like they would work. The hybrid Sierra/Silverado seems pretty cool for the built-in generator function, but they don't seem to be making new ones, and I'm not a fan of the old GM interior. But a second alternator connected only to the trailer charging system would give some of the same functions (not the auto-engine start, nor the same efficiency I bet). No rush - for now I can borrow or rent a truck to move it, I think.
|
|
|
|
|
10-20-2006, 08:04 PM
|
#7
|
3 Rivet Member
1964 26' Overlander
Alameda
, California
Join Date: Sep 2006
Posts: 161
|
Thanks for the welcome - I initially thought those PVC pipes were sewer-hose related, but the sewer hose is in the bumper compartment, and there's a big tarp made of the same kind of material as the awnings in the trailer, which is why I suspect that there are poles in there. I guess I could just take off the caps, huh?
Catalytic heater, that makes sense. Well, that's slightly more reassuring than an open fireplace. It's connected by rubber hoses which I thought was not okay in trailers, but maybe I can use it in the end. I confess to being pretty afraid of CO from dysfunctional gas appliances - got my CO & smoke detectors already there in the trailer though. I was thinking I would put a furnace back in, or maybe a new catalytic heater.
Where do you keep the trailer in Alameda, BeBop? The alternative to moving to someplace I can keep the trailer is to rent somewhere I can work on it, maybe a big storage unit, but I wasn't able to find any nearby that were economical (well, I found one that was $150/month in Alameda, but they didn't have any 10x30 units available). I don't really need storage for anything but the trailer, but I do need tolerance for working on it...
|
|
|
|
|
10-31-2006, 02:02 PM
|
#8
|
3 Rivet Member
1964 26' Overlander
Alameda
, California
Join Date: Sep 2006
Posts: 161
|
The window seals arrived from Vintage Trailer Supply, along with a lot of other stuff, but I haven't had time yet to really work on them. So far what I've been doing has been mostly investigating the current state of everything and removing, well, junk.
I took up the old carpet first thing, and removed the original vinyl tiles, which were in pretty poor shape. The floor underneath seems very sound though.
I removed the fixed bed that had been installed in the back. Underneath was the freshwater tank, which had apparently been installed in the 70s or 80s. Unfortunately, the soldered joints on the copper pipe had broken in several places, which was what was causing the water on the floor - the water tank was also sitting on a nice piece of shag carpet that had soaked up a lot of water. Luckily the floor damage there is minimal - mostly just stains, nothing serious in terms of bulging or rot. Here's a photo of the back without the bed, water tank, carpet, or vinyl flooring:

Lots of space there for me to work with since I intend to have only one bed in this!
I removed one of the windows from the frame to see how it was done (pretty straightforward) and removed the original window stripping. There didn't seem to be any bedding tape behind the glass - maybe it completely disintegrated over 40 years. I just taped the glass back in the frame, I'll replace the seals this weekend.
Now, on the bulb seal that sits behind the windows themselves (in the frame that's fixed to the trailer), it really looked to me as if what was there was MUCH smaller than the replacement I got from V.T.S. Is that right? Hoping that the new one will work anyway, although the bulb seals look to be in much better shape than the exterior stripping.
For a less important task, I replaced all the teardrop marker lenses. I went as far as drilling out one of the original marker-light bases & replacing it, but although the others are corroded, they still work, so for them I just replaced the bulb & lens. I'll come back and clean up (maybe paint) the steel pieces in the bulb base later and use some contact cleaner to get rid of corrosion on the copper, maybe. The new ones didn't have any rubber seals - just a gap between the lens and the base. On the one hand, the old seals didn't seem to actually keep much water or gunk out anyway, and I'm wondering if the water just washing through won't matter. On the other, well maybe I'll try sealing them with vulkem or something after I replace the bulbs with LEDs (which won't burn out for a long time).
Took off one of the tail lights - it's a 4-screw Autolamp type, not the 3-screw type that V.T.S. sells. They're actually okay but pretty dim. I think I'm right in thinking that the LED lamps that InlandRV sells will fit as a simple replacement, and they look like they match okay - I'm more interested in safety than exact originality anyway.
I took off the front rock guard by pulling the hinge rod, and today I'm going to order the perforated aluminium to replace the worn-out fiberglass. I'm hoping that'll look pretty good.
Let's see... I removed the (non-original) Magic Chef cooker from the kitchen cabinet, which just about fell apart in the process - it's been cut about in so many ways to remove the old furnace, put in a new cooker, and put in that catalytic heater that there isn't much left of the frame, but I think I'm going to repair it anyway. The countertop looked okay from the top, but was sagging & rotten underneath, so that sadly has to go too. I'm not sure yet whether I'll go for a wood countertop or another formica top (maybe in a slightly less boring colour). I'm planning on putting a smaller 3-burner cooktop in with a compact dishwasher underneath (convenient for plumbing) and a microwave opposite next to the fridge. I'm not sure if I'll keep the original 2-basin sink or not - I'm leaning towards yes right now though.
So what I'm thinking there is that I will remove that cabinet, repair the frame, replace some of the panels, and fit the new countertop, cooktop, and dishwasher. I might put a stainless steel, copper, or aluminium backsplash on the wall behind it.
I took out the 3-door cabinet that was above the rear bed as the bottom panel in it had warped & delaminated badly. It's now in my kitchen... the frame for it is pretty sound, so I think I'll replace all the plywood panels and have it good as new. I may use baltic birch ply or bamboo plywood which of course won't match the original cabinets, but to be honest most of the panels in those have similar (but less serious) problems with delamination, so maybe they'll all get replaced.
After I took out that cabinet, the vinyl ceiling insulation was freed from around it. I was hoping to take this out intact to give it to someone else who's restoring maybe, but although the vinyl surface was mostly okay, the backing cardboard was full of mildew or mould and pretty much disintegrated as I was taking it off, so it all wound up in a garbage bag (I must have filled a dozen or more large trash bags with all the stuff I've taken out of the trailer, without even counting the mattress or the large pieces of wood).
The paint underneath was in better shape than the rest of the Zolatone, which is pretty grubby, but I still find the colour pretty ugly (and there's a lot of damage to the paint). So I'm still leaning towards sand-and-repaint there.
On a less fun note, I think I identified the problem with the cracks in the skin above the door, after I removed the aluminium trim at the edge of the step. Basically the floor at the front edge of the doorway has rotted, and because the outrigger frame underneath doesn't seem to extend to the edge of the floor, the floor has crushed & warped downwards under the weight of the shell, causing it to distort and crack around the door. I'll post a photo when I get a good one. So I'm thinking I may need to cut up a small section of the floor there and replace the plywood. I'm not exactly sure how I can bring the shell back to level though (lack of convenient places to lift it) but I guess I'll figure it out. At the same time I should be able to check the frame for rust through the hole, clean it up, and POR-15 where there are problems. From the tiny hole I made by bending back some of the belly skin, the outrigger there next to the step looks like it has surface rust but not too serious.
I'm not sure how the step is attached to the frame or floor. It's obviously a high-stress point so hopefully it's solid but I guess I'll find that out too when I remove the floor.
So currently the trailer has neither a greywater nor a freshwater tank. I do have a plan for the greywater; I think I'm going to put it in the closet just behind the curbside wheel well. I ought to be able to fit 40-50+ gallons in there just taking up the first 12-18" of the space. I don't hang much that requires the full height of the space, mostly just shirts, so of all the near-the-wheels areas above the floor it seemed like the least intrusive. Also, the drains for both the sink and the bathroom washbasin go through there, so it'll be easy to interpose the holding tank, and there's already a vent pipe there. The sinks can gravity-drain into the tank, but obviously it will be above the level of the bottom of the shower, so my plan there is to put in a marine sump pump box in the back compartment that will pump shower water back to the greywater tank. That means running 2 pumps when taking a shower but I think it's the easiest solution.
For freshwater it's not quite so straightforward. Obviously with the fixed bed remove there's a lot of clear space on the streetside back, but I kind of want to reserve that for something else. The space I'd like to use is under the front gaucho (because it's not very useful when you have the bed folded out most of the time, as I'm envisaging) but I'm mildly concerned about the increase in tongue weight that would cause. But, I've seen that a lot of other people do it without problems, so that's how I'm leaning. I may use the existing (not very well-sized) water tank or have a new one fabricated that fits part of the space better.
I'm planning to add a much larger AGM battery & inverter/charger, probably somewhere on the streetside near the wheels. Haven't exactly located that. Then I'll run one cable to the back for the existing 12V circuits and put a sub-fuse-panel in the back compartment, and run new 12V circuits from the new battery compartment.
Basically I'm pretty happy - the floor is sound except for that one spot by the door, the skin looks good, the drainage from the sinks looks like it works fine, and the original cabinets are usable for now even if some of the panels could use replacement.
I do need to find a better place to keep it though. A quiet suburban neighbourhood is not a good place to be loudly drilling aluminium, wirebrushing with an angle grinder, or riveting in the evenings and weekends. So, I need to find either a storage facility that won't mind if I work on it, or maybe the corner of some parking lot in an industrial area that I could rent. Any suggestions in the East Bay area? Emeryville or Oakland would be better than San Leandro...
|
|
|
|
|
10-31-2006, 03:45 PM
|
#9
|
2 Rivet Member 
1964 26' Overlander
Norman
, Oklahoma
Join Date: Jan 2003
Posts: 70
|
Welcome to the forums. I also have a 64 Overlander. You can view some pictures by going to the photo section and executing a search under MW64OVERLANDER asking to search all forums. The trailers have different floor plans, but a lot of the trailer is identical. In a previous post, you had questions about your axles, and having dealt with this issue myself, I would suggest putting an axle replacement in your budget at some point in time. It makes all the difference in the way the trailer tows and handles the highway bumps and potholes. It looks like you have your project well under control, but if I can be any help with questions or advice, just pm me and I will do the best I can.
__________________
Mark Wilson
1964 Overlander/2000 f250 Crew Cab 4X4 PS WBCCI# 5600
|
|
|
|
|
11-15-2006, 03:16 PM
|
#10
|
3 Rivet Member
1964 26' Overlander
Alameda
, California
Join Date: Sep 2006
Posts: 161
|
Thanks, and I think I will be replacing the axles once the exterior is otherwise done. The sheared rivet heads inside speak to some vibration damage I'd rather did not continue.
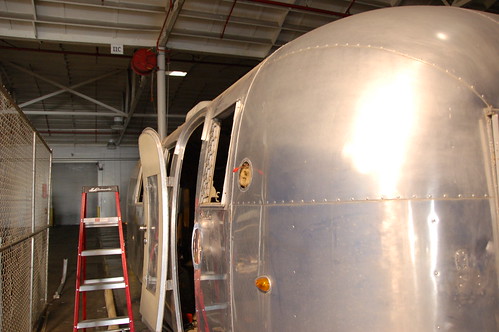
I moved the trailer from my friend's house to a warehouse in San Leandro, where I'm renting space at $300/month. Ouch, but I can get access 24 hours a day, it's in an industrial neighbourhood where nobody will mind the noise, and I can do all the basic work in peace and without having to worry about keeping it sealed against rain. Hopefully I'll be done in 3-6 months. I don't yet have access, that should be available this weekend.
In the meantime the sheet of perforated aluminium I ordered from onlinemetals.com arrived - this is to replace the ragged fiberglass in the front rock guard. Here's a couple of photos of it during a test fit (with cable ties rather than real fastening, and before cleaning & polishing the frame):
 
I think it looks good and it's surprisingly light - really not much heavier than the fiberglass it's replacing. The holes are 1/4", so I guess it's possible a stone could still penetrate, but I think it'll be okay.
I need to work out how the hardware works - I couldn't get it to latch up from the window before, but I didn't try very hard. I removed the supports to clean them and paint before replacing.
I'm looking at the floor problem as well, and replacing the window seals.
|
|
|
|
|
11-15-2006, 03:39 PM
|
#11
|
3 Rivet Member
1964 26' Overlander
Alameda
, California
Join Date: Sep 2006
Posts: 161
|
Actually that should say "I HAD to move it from my friend's house". I was planning on doing so anyway, since I couldn't do significant exterior work there, and it was a little in the way there, but their landlord sent them a letter stating that they were in violation of their lease and MUST remove the trailer or vacate the property in 7 days. Then he came around and started taking photos of their house from across the street. He was also demanding that they remove the motorcycle belonging to one of the tenants.
Some boundary problems there! Of course, there was nothing in the lease about what they could or could not do with the driveway of the house they rent, nor any verbal agreement on the subject, and storing a trailer in your driveway is entirely legal in San Leandro, as evidenced by the numerous other trailers & RVs in driveways on their street. (And, of course, owning a motorcycle is legal too - and this one is a particularly quiet BMW). As a long-term renter myself, I find it extremely annoying when homeowners & landlords fail to understand the legal concept of "quiet enjoyment", which is to say: as long as you don't break the law, cause serious damage to the property, or violate the terms of your lease, your rights as a tenant are the same as those of a homeowner. You don't get to make up new rules for your tenants as you go along.
Oh well - if I didn't need to work on it, and it was the driveway of myown house, I might have argued over it, but even my friends were a little sad to seem like they were caving in to their nutty landlord.
Still - indoors, and able to make as much noise as I want, those are good things.
|
|
|
|
|
11-15-2006, 11:43 PM
|
#12
|
Rivet Master
1963 16' Bambi
1962 22' Safari
Yreka
, California
Join Date: Mar 2006
Posts: 1,937
|
Welcome to the forums!
Wow! Fabulous firsts posts! You are well on your way! Be sure and check out the rally calendar on the blue toolbar ~ attend one near you with or without your trailer. You will get a chance to talk to folks about their trailers and how they repaired this n' that.... and meet some really fine folks!
I love your pictures! Keep posting!
Mrs. NorCal Bambi (traveling in S Tardis)
|
|
|
|
|
11-20-2006, 05:01 PM
|
#13
|
3 Rivet Member
1964 26' Overlander
Alameda
, California
Join Date: Sep 2006
Posts: 161
|
Well, I cut out a section of the belly skin under the problematic floor area, by the step. If you look at this thread I posted some photos of the problem - the floor has rotted from water coming in at the door and also at the edge of the banana wrap, where the awning brackets were bolted to a frame outrigger. I suspect it looked particularly bad in those photos because it had gotten wet, but it's crumbling at the edge, particularly at the doorframe.
Here's what I found underneath the floor:
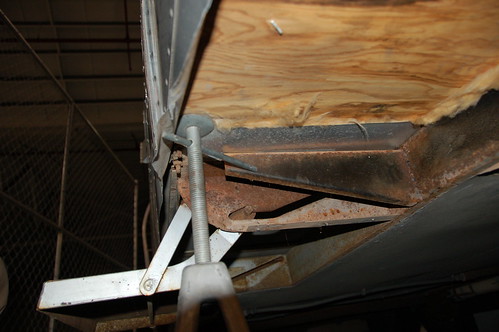 
It really doesn't seem so bad - other than a few pounds of dirt that fell on my head as I was cutting (lots of fun), there's some rust but everything seems structurally OK, no bird's nests, no mice, and it was completely dry. The section of rotted floor seems to be just the very edge, like the last inch or two where it's under the frame. So I'm thinking I will put in a piece about 12-14" wide, from where the banana wrap ends to the door, or possibly across the door and maybe even a little further (as the floor seems to have sagged a bit to the left of the door too). Joined to the existing floor, that should keep the shell level and be pretty solid.
Once that's all fixed up I'll trim the edges of the old belly skin section neatly and patch it with a new piece of aluminium.
I'm pretty happy about how solid the floor looks. The plywood looks good even in this area where there was water penetration. Everywhere else there's not even this level of damage.
|
|
|
|
|
11-20-2006, 05:32 PM
|
#14
|
3 Rivet Member
1964 26' Overlander
Alameda
, California
Join Date: Sep 2006
Posts: 161
|
(Since I'm keeping this as a sort of logbook...)
I also: - Removed the awnings, awning poles, and the awning rails from the street side and rear (the awning fabric just tore off). There were a lot of screws holding these in place, covered in gobs of silicone that don't seem to have actually stopped it from leaking, and I forgot to charge my drill. So I removed them all by hand. Ow. I cleaned a little but it still looks dirty, but better than with two mildewed awnings covered in brown sealant for some reason. I still need to remove the awning brackets and arms, and the much bigger job of either getting the curb-side awning off or keeping it but replacing the fabric and sealing the brackets better, since it would be quite useful, and it's not as ugly as the square-tubed smaller awnings were.
  - Removed the circular TV antenna and decayed fridge vent cover from the roof. Also took out the chimney section that goes through the skin to patch it up - all the sealant was flaking out. I need to get a new vent cover.
 - Cut off the nameplates with a putty knife & hammer - got that tip from here. I have replacements for the front and back plates, but not the serial number plate. I'm not sure if I can restore it - the "International Land Yacht" lettering is completely gone (maybe it was raised, stuck-on letters?) and the paint is very faded, but I don't see how I'd repaint without ruining the trailer & bicycle logo. I could mask the rest. Need to clean the area where they'll go, drill the new nameplates to fit the holes, and seal & re-rivet.
 - Replaced the worn chrome/brass doorknob with a cheap stainless steel one for now. I'll probably put a chrome knob on when it's polished.
 - Replaced the door catch. Of course, the new doorknob means it won't catch anymore. Oh well, it's indoors for now so I can wait to fix that.
- Removed the original extending TV antenna. It's very cool, I like it, but I wouldn't ever use it and I like the look of the front without it. I cleaned under the brackets a bit and filled the holes with Olympic rivets. Hopefully when it's all cleaned and polished you won't be able to tell it was ever there.
- Took off the propane bottles so I can wirebrush and POR-15 the hitch section. Turns out I do have a Reese dual-cam weight-distributing & anti-sway hitch - I just need bars and the ball-mount parts for the truck. Since I don't actually have a truck, this can wait.
 - Removed the porch light. This was original, but the lens was broken and I couldn't find a new one. So I'm going to get the one that V.T.S. sells instead.
- Removed the taillight lenses. I'm going to get LED taillights of the same size. Not quite as stylish, but they'll work (much) better. You can hardly see the taillights right now.
- Took off the license plate bracket, which was corroded and all the rubber was shot. I believe identical replacements are available so I need to get one.
- Removed another window (the one over the dresser) and removed the damaged window stripping, and the old bulb seal. Getting the window off the hinge was a huge pain so I didn't put it back on yet. I still want to get tempered glass for all the windows anyway.
- The back window was replaced with plexiglass and installed with silicone sealant. Yuck. I cut out the plexiglass and removed most of the silicone by abusing a screwdriver in the slot, but I will probably need to use solvent to get all of it out.
- I did one 20" edge of bulb seal on one window before deciding that A) that was a lot like hard work and B) it could probably wait because C) I bet I could sucker one of my friends into doing it for me.
On the inside: - Took out the overhead cabinets over the kitchen (both sides) and the cabinet face from the overhead cabinets over the front window. These are to go home for repair and refinishing, and while I paint the interior, and OK, just to get them out of the way. That leaves only one to remove, the one over the dresser in the back, but to get that out I think I need to cut through some inaccessible screws.
- Took out the cooker fan in that process. It doesn't work anyway. I'm going to look for a stainless-steel replacement, but I haven't thrown this one out yet.
- Removed all the window openers (3 need replacing - 2 are stripped, one is too small for the location and really hard to turn) so I can take out the windows.
A busy day (this was Sunday). I'm happy with the trailer's new location in a warehouse - NOBODY else around, miles from anyone who could complain, a nice flat concrete floor, and good, bright overhead lighting. It's not quite my own personal workshop space, but it's close. If anyone in the bay area is interested, I can put you in contact with the guy renting it - maybe we could even get a better deal than the $300 for 30'x12' for a bigger, shared area. Actually since there's nothing around me for about 100 feet in every direction, and nobody else there, when I'm working I can pretty much use as much space as I want as long as it's cleared back into my assigned space at the end of the day. (That's not by explicit consent of the management, but I don't think they care as long as I clean up and keep paying my rent - I am explicitly allowed to be working there though.) I can also pull my car right up to the trailer which is handy, and there's 24 hour access. There's supposed to be electricity, but right now I'm just running a long extension cord since I don't need it to be on when I'm not there. Of course, it's in San Leandro, not the center of the universe, but there's a Home Depot and Wal-Mart (and mostly importantly, STARBUCKS) right around the corner.
|
|
|
|
|
11-20-2006, 05:45 PM
|
#15
|
3 Rivet Member
1964 26' Overlander
Alameda
, California
Join Date: Sep 2006
Posts: 161
|
I also got a new kitten:

but technically I guess that is not strictly progress on the trailer. But he is awfully cute.
|
|
|
|
|
12-04-2006, 03:44 AM
|
#16
|
3 Rivet Member
1964 26' Overlander
Alameda
, California
Join Date: Sep 2006
Posts: 161
|
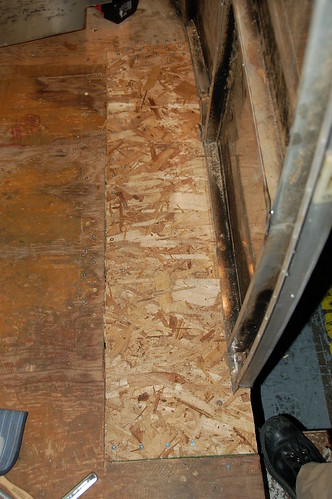
Cut out the rotted section of floor by the door on Saturday with the assistance of a friend & her circular saw & jigsaw. To make a decent-sized patch, we cut about a 1'x4' section. The rot was actually worse further forward to the point where I could push a screwdriver straight through the floor.
I cut off either the head or the shaft of about half a dozen floor bolts with a cut-off wheel on the angle grinder. That was entertaining. Here is an exciting action photo:

You note I am wearing goggles and gloves. I could've used a long-sleeved shirt though. Ow.
Got some wood for the floor - I bought OSB, oriented stranded board, rather than plywood. Seemed pretty good to me. My friend cut it using the old pieces of wood as a guide and it test-fit in the gap perfectly. Screwed and glued the cleats after that.
On Sunday, finished the floor patch. The new section went under the shell no problem, glued & screwed it to the cleats attached to the existing floor, and then put bolts through to connect the floor to the shell, and the floor to the frame underneath. After putting in the five or so that were there originally, I decided, why not overdo it and put in another 20ish. Actually some of those were to connect the shell to a section a little further forward that's a little rotted, not bad enough to repair and not anywhere anyone ever stands, but just some reinforcement.
New floor screwed in:
Bolts on the underside, and the cleat (with the glue dripping off it):

Also some bolts in the old floor to connect it to the frame closer to the joint with the new floor. And a few bolts at the edge of the step to fix it in place. Basically, not like too many bolts is going to hurt.
New bolts into the step frame:

On top then used wood filler to fill the gaps and some of the screwheads and assorted holes, and also where the original floor had flaked up a bit. All of this will be concealed under the new floor. Anyway, with all those bolts the new section of floor is rock-solid, and so is the shell by the door, and the strain is all out of the section of skin above the doorframe where it had cracked. So basically, problem solved.
New floor with filler all around it:

Four things before that section is finished: clean and paint the frame sections I can get to underneath there; apply insulation to the bottom of the floor; replace the belly skin, and sand the floor surface level for the new flooring.
Also took off the curb-side awning:
The brackets for this were also the reason the floor was rotten. I'm happier without it although I guess in theory shade would be nice.
I've been thinking about putting the grey and fresh water tanks under the floor between the axles.
I can now see that the drain from the shower is actually above floor level, which means there would be plenty of slope to run it to a sub-floor tank, and because the dump outlet is right at the back, even if the slope from the tank to the drain outlet isn't that great, I can raise the front of the trailer with the tongue jack to create more of a slope. So I think that could be quite workable.
Another thing we did (and when I say "we" I mean I made another friend do it) was trace out the patterns from a bunch of rotted plywood sections of the original interior, remove any fittings, and then toss it in my car for the dump. This reduced the amount of useless junk getting in the way considerably.
And then finally we (and once again I mean, mostly, the other friend) put new foil-bubble-foil insulation on the insides of the sections of skin that were exposed. We put two layers of insulation, the first one glued to the outside shell with gorilla glue, which should act to prevent condensation on the inside, and then another on top of that just stuck on with mounting tape, so there's a little air gap. Then some foil tape in places to seal some of the edges.
Insulation:
  
To reduce the amount of conduction transfer I might put mounting tape or foam tape down the ribs where the interior skins connect, so there's no actual metal-to-metal contact. Of course this is about 10% of the entire interior, but I might as well do this section the way I'd want it all done.
Anyway, a good weekend, especially the floor. For a while it's been all demolition and it was nice to get some progress towards one little piece being finished.
Oh yeah, and here is the new rockguard on the front window:

The Airstream nameplate is just sitting on the window sill, not attached to the shell yet.
I think it looks pretty good, although there's no lifting hardware yet. It's about the same weight as the original fiberglass, very easy to lift.
|
|
|
|
|
12-20-2006, 05:50 PM
|
#17
|
3 Rivet Member
1964 26' Overlander
Alameda
, California
Join Date: Sep 2006
Posts: 161
|
Another progress report. I've been working on the electrical system lately after removing the toilet & bathtub from the back (and the battery).
The simplest job was the new LED taillights from Inland RV, which I really like:

I think they really match the original look,and they're much brighter than the old ones. I had to install the new ones about 1/2" down from the original location, because the original screw holes were too big for the screws that would fit in the new lights. Filled the old holes with rivets, no problem.
Also tested the running lights with new bulbs & diffusers from V.T.S., as you can see there. All good - although I already have a plan to replace those with LEDs too, and in fact one of the LED lights I'm going to test arrived yesterday.
I replaced the porch light entirely with a new one from V.T.S. - mine was not the same as the one they stock and I couldn't find a new lens for it. The new one looks fine, but was a tiny bit smaller than the old one, just enough to need a little work around the edges to make sure the old mounting holes didn't leave gaps.
On the outside, I cut out the original power supply cable (which had an oddball connector on it - maybe a standard non-locking 30A connector, but not the TT special connector - plus all the connections were wrapped in electrical tape and looked very dubious). I got a Marinco stainless-steel inlet from V.T.S. and a yellow power cord to go with it - I put the outlet on the street side, where the original water inlet was. Because the hole for it was a little large, I cut a square patch with rounded corners, then cut the correct-size round hole in that for the new power inlet, then riveted it over the original hole. The side-effect of this was that it also reinforced the connection. The connection was also right above a horizontal rib inside the shell, providing a bit of extra support. I seem to have forgotten to take a photo, but other than the stray Vulkem (yes, I should mask the skin, I KNOW) it looks great. And I like having a power cord that's not attached to the trailer and can be rolled up separately, and obviously one that has moulded plugs and isn't home-made.
I do have a photo of the boring inside of that:

I actually used an 8-gauge wire which is more than you need for 30A, 10-gauge would have been sufficient and easier to work with.
You can also see there the other project, which is going to be moving all the electrical stuff into the streetside-middle of the trailer, where the new and larger battery & inverter will be. Inside the bathroom closet and under the toilet bench was just not a good place for all that, and it'll be easier to run new circuits from the middle. So, that involved digging out the 110V and 12V cables and extending them forward.
For the 110V cables I used junction boxes - could only find shallow single-gang boxes which is why there's three of them, but they'll be inside the closet anyway, so no big deal. All the original cabling turns out to be 12/2 so the 20A circuit breakers are not actually over-rated. There are three circuits; one feeds the A/C, and the other two each feed some of the outlets. I plan on adding at least one or two more 15A circuits and many more outlets - already added one new outlet box at the back, but the place I want to put the others is at the front, over the table, for laptops, chargers, and other light loads.
For 12V, there are four circuits, one for the lights and the other three each feeding a nearly-random assortment of other stuff. I'll probably run new circuits for my new water pump and other high-amp loads, but the existing cable with 12-gauge extensions should be sufficient for the existing smaller loads, especially with LED lights replacing many of the incandescent lights. I extended those forward just with butt splices as they're low-voltage.
In the course of that, I also took out the voltage converter and the circuit breaker panel. They're eventually to be replaced; for now they're still in use, just sitting around:

I really need to label all those wires, especially as the 12V & 110V wires are exactly the same. I plan on running conduit along the top of the wheel well, where it'll be covered by other cabinets in the end, and the electrical panel will be about where the breaker box is now.
While I was on the electrical kick, I decided that I wanted regular on-off switch for the overhead lights, rather than having to reach up and turn the 4-way rotary switch. Even if I replace the entire 1964 fitting, I still want light switches at a normal height. Since I'm not removing any of the upper inside skin, the only way to run wire a decent distance is on the surface, which is ugly. On the other hand, most of the surface conduit will be covered by overhead cabinets, I'm filling the gaps between the conduit and the ceiling/wall with epoxy putty, and when painted to match the walls it shouldn't be too offensive. Here's the ones I did:
  
And an overview photo:

Of course, they look especially intrusive right now in that bright white. The switch by the door was originally the water pump switch, but I repurposed it. I may just add another switch there and return that one to being for the water pump, we'll see. Basically, I threaded the cable though the skin up to the level of the first horizontal rib at window level, and then drilled a hole and brought it through to the surface and into the wiremold channel. At the light end, I drilled another hole and fished it through to the back of the light fitting.
In the kitchen, I installed two new switches over where the sink & cooker will be. These will control the lights & the extractor fan. (I found that the original fan was still working, but I think the switch had died. Anyway, I prefer a visible switch on the wall.)
I had to put the switch for the lights toward the back in a surface mount box, because between the two over-the-bed windows it turns out there was a rib in the way inside the skin. I may still get in there and cut away enough of the rib that the switch will fit mounted flush, if I get around to it.
I'm quite pleased with this - I like having real light switches and hate fumbling around overhead.
As you can see in some of those photos, many of the original interior rivets are being replaced with Olympic rivets. So far it's mostly ones that had sheared or just come loose, but I will eventually be replacing every single visible interior pop-rivet with Olympic rivets. Why? Well, partly because so many of the original rivets had failed (this trailer NEEDS new axles), partly because there were a lot of screw holes that had enlarged beyond being re-usable, but mostly because I really like the look of the domed head rather than the ugly holes in the center of the regular pop-rivets. In fact, I like them so much that once I've repainted I plan on shaving the paint off the heads of all the ones that are in neat lines (not the strays) so they'll contrast with the paint. So I'm not even shaving the heads of most of these, just clipping them down with diagonal cutters.
On the Big Jobs front, having done one floor patch, I now need to do another right at the very back of the trailer. Here's what's there now:

A huge hole over the black tank (is that normal?), the back section completely rotted away and taking some of the C-channel with it, and rot all around the sides.
Now, replacing the floor itself is not so bad - two sections, for the left & right sides, and then maybe a smaller patch on the curb-side a little further forward, but the black tank is a challenge. I think I'm going to take it out either upwards or downwards after I cut away enough to see which is more practical. I did cut away the belly skin under the black tank and saw that the original metal box it sat in has almost completely rusted away. In fact, the tank is supported on a couple of 2x4s screwed onto the remains of the tank support box. Innnnnteresting. This probably explains why it's so low, too. So I think I'll replace the tank support box somehow, hopefully gaining an inch or so of clearance, and have the floor extend over most of the black tank with cutouts for the toilet flange and the vent pipe, rather than having most of it exposed as it is now. I debated replacing it entirely, but since I think it doesn't leak, and it fits pretty well, and that really is the best spot for the toilet, it decided to leave it be. Oh, and I need to fix the flange for the toilet, having broken it while removing the toilet. HULK SMASH!!, as they say.
I removed the bathroom - tub & sink - which was a fun game of Where Is That Last Rivet?? - my favourite! Brute force got it out in the end, with only minor collateral damage. I cut off the toilet bench section with a jigsaw - goodbye 1964 design, sorry. The bathtub and sink will remain roughly the same, with a new surround under the tub. I think I'm going to take it off to be professionally gel-coated though.
So, once the floor there is replaced, and the black tank back in place, I can reinsulate the wall cavities, replace the inside skins, and finally PAINT. I'm debating sanding before painting; the Zolatone is quite textured, and it sands fast down to a smooth surface, but still there's a lot of area to cover. I guess we'll see how lazy I am. I wirebrushed a little patch of the wall as a test - it actually looked great, a bit like brushed steel as you'd expect - but I fear corrosion, and anyway the end caps are fiberglass. I sanded another piece down to bare metal with the random-orbit sander and it also looked pretty good. We'll see - I may wirebrush or sand the wall behind the kitchen instead of putting in a stainless-steel backsplash as I was planning, but for the most part the interior will be painted.
Two separate tasks I'm still working on; one is glass. New tempered replacements for all the panes came in last week, visible on the floor in that picture. If I can keep from stepping on them, it shouldn't take too long to do. I did two panes already:

OK, you can't see much in that photo. But they're there. I may have to redo the non-opening window on the right as I don't think I got a good seal with the butyl tape.
Actually doing the windows is a pain. First the old glass has to come out. I am really good at breaking it in the process. Then both the frame in the shell and the frame that lifts open have to be cleaned, by hand or with a dremel, and the channels in them for the window stripping and bulb seal cleared of old rubber, adhesives, and silicone using picks, solvents, screwdrivers, and other implements of torture (torture to my hands, anyway). Then seating the glass on the butyl strip is actually quite straightforward, but I have still to get a good section of the window stripping from V.T.S. installed properly. I'm going to take down a hairdryer and try heating it next time, with silicone lubricant applied copiously, but it's still really annoying and I'm starting to think about a plan B, like a generic window stripping that doesn't go into the channel or something.
The bulb seal is also a pain, but I have managed to get some of that to go in correctly at least.
The other major task is working underneath the trailer to remove sections of the belly skin for various frame painting, wiring tracing (and some new wiring), and measuring/preparing spaces for underfloor grey and fresh water tanks. I found the angle grinder with a cutoff wheel goes through aluminium sheet like a hot knife through butter, so getting off the sheets has been easier, but a full-face mask is a necessity to avoid getting dirt in your eyes & mouth. Ugh. It'd be easier if I jacked the trailer, but the storage place wants to move it before January so I can't do that yet - anyway, I only want to jack it when I really have to.
The frame is pretty good, rust in a few more places than I'd seen but basically very sound. I need to paint it, another unappetizing task.
On the wiring front, I got a new moulded 7-way cable from V.T.S. and replaced the extremely corroded original cable with it. I connected the ground, running lights, brakes and tail/turn lights wires, but connected the battery wire only to the hitch jack, at least for now. My thinking is that tow-vehicle charging is a very unreliable source of power, there are various issues from cross-connecting them, and I'd be better off doing something like running an inverter from a heavy-duty alternator on the tow vehicle to a battery charger in the trailer. Not as efficient, but ensures full isolation between the system. Or, I could get a truck with dual alternators and have one dedicated to charging the trailer battery, with heavy-gauge wires. For now, I'm just going to assume that shore power or a generator will charge the house battery.
The other thing I'm doing is running a circuit & switch so I can turn on the running lights and the hitch jack either from the tow vehicle or from the house battery in the trailer.
Anyway, despite the chaotic appearance of the trailer and the complete lack of interior right now, I feel things are coming along. I'll be really happy at the milestones when I'm done fixing the floor, when the interior panels are all attached for good, when the new grey & fresh water tanks are installed, when all the windows are done, and when it's painted on the interior. That's when the fun stuff can really start - plumbing, new on-demand water heater, new furnace, possibly a generator built-in, and of course, replacing & rebuilding the cabinetry in the interior.
|
|
|
|
|
01-11-2007, 03:45 PM
|
#18
|
3 Rivet Member
1964 26' Overlander
Alameda
, California
Join Date: Sep 2006
Posts: 161
|
Last weekend was mostly focused on windows, as I was tired of having the brand-new tempered glass sitting on the floor just waiting for me to step on it. So, I stripped out all the old glass from the frames - initially I tried to cut it out, but since it always broke anyway I got to doing it the quick way by the end, kicking it in (with eyes closed! wearing safety gloves & glasses!) and then taking out all the fragments. Then my loyal assistants cleaned & polished the frames - you can get a lovely mirror finish on them but good lord does it take a long time to get there. We were using, variously, rags, Nuvite polish, and cotton wheels on the Dremels. If you really worked at it, you could get every single pit out and get a perfect mirror, but we didn't have time to do that all around. Laid in the new tempered glass - I used 1/8th, as the place couldn't do 3/32 like the original - and the hazard that I would break all that expensive glass was gone. Plus, I can now actually heat the interior of the trailer and work in something less than Siberian conditions. It's freezing here in Northern California right now. Here's some of the windows installed, anyway:
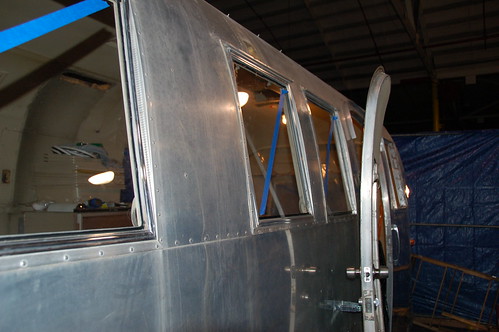
Anyway, I'm very happy to have nice tough tempered glass in all the windows, and just to have glass in the rear window, which had been replaced with plexiglass.
I also cleaned some of the frames in the shell (where the bulb seal goes), mostly using a dremel with a wire wheel. Not good for the finish, but these are pretty much hidden anyway and it does a great job of taking off all the corrosion. Soon those will be ready for new bulb seals all around. And then, eventually, I'll need to see about getting the window stripping around the glass.
Other than that it's been electrical work, patches, cleaning off excess sealant on the exterior, and shaving hundreds of rivets. If you've used Olympic rivets, you've probably encountered the ones that don't fold correctly on the back (probably obstructed) and snap off without leaving the mandrel in the center hole. So they have a dome with a big hole in the middle. Sometimes they've actually seated pretty well before they do that, sometimes not. Now, you can usually get those to seat correctly by drilling them out and replacing them using very very gentle pressure on the riveter handles, but for ones that have actually made a good connection, just snapped off in the wrong place, you can sometimes take a loose mandrel (usually plenty on the floor!), insert it in the hole, and then cut it off close to the face with diagonal cutters. That'll usually deform the mandrel enough that it'll stay in. Then you can shave it normally using the rivet tool and it'll stay in. If that doesn't work - sometimes the mandrel just spins and never sticks to the rest of the rivet - I've sometimes had better luck using a Dremel with a grinding bit. Anyway, thought I'd pass that along.
Here are five of the new outlets installed above where the table will be, and further forward by the front window:

This weekend I should be able to finally replace the floor right at the back of the trailer. Last weekend I took off the black tank (which is in excellent condition, but I may not re-use it as it's rather small & may not work with my new plumbing layout) and the decayed remains of the box it used to sit in, and the belly skin underneath it and under the bumper storage compartment (all filthy, corroded & ragged). Here's a view of that:

So, once the remains of the tank frame are cut out, I can cut out the rotted floor & replace it. I'm going to use three pieces - one for the street-side at the back, one for the curb-side, and one for further back on the curb-side where the awning bracket had caused rot along the wall. Then the whole floor should be solid, which will be a great milestone.
The next step after that is plumbing, which is going to be fairly tricky. I think I'm going to go for two large tanks between the frame rails, foreward and aft of the axles, for grey & fresh water. Both will probably extend a few inches below the belly pan, so I think they could be in the 30-50 gallon range. Weight should be fairly good - freshwater being the one with most weight in it while towing, and just forward of the axles being a good spot. Then for the black tank, I'll either re-use the current one in the current location, with new supports, or else have a new one made that fits inside the frame rails but perhaps extends further back - I was actually thinking right into the bumper compartment could work, but we'll see. If I did it that way, I'd probably run the drain lines forward to an outlet just behind the wheels on the street-side, which I think is how the new Airstreams are laid out. It'd be a short run from both the grey & black water tanks to there and ground clearance shouldn't be a problem that close to the wheels.
Once I have the tanks planned & ordered, I have to get PEX line & fittings, get an RV500 on-demand water heater, a new water pump, and start hooking things up. Pretty much all the original plumbing was shot - connected with hosepipe & hoseclamps, leaking, or just a spaghetti mess. Also, most of it was copper which is nice but extremely heavy.
Once the tanks are in, and I'm done underneath the belly skin, I have to replace it. The main thing I want to do under there is remove the galvanized steel ducting for the furnace, since I'm not going to have a furnace anyway, and it looks heavy, then patch the holes in the floor that the ducts ran through. I also need to finish repairing the wiring that goes through the belly pan, and run some new wiring for projects of my own...
Up above, I then need to prepare & paint the interior skin. Preparation may involve sanding it all to remove the Zolatone texture first. While I'm at it, the bathtub & bathroom sink need new paint; once that's done, I can reinstall them in their original position, and get a toilet and install that too.
Once the interior is painted, I can put in a new floor covering - marmoleum possibly, or engineered bamboo or wood or even real bamboo. We'll see.
Other than that, and in no particular order, my checklist looks like: - Finish replacing bulbs in exterior teardrop lights with LEDs.
- Replace the refrigerator vent & the new cover.
- POR-15 the frame.
- Replace the cooker vent cover.
- Replace the door seals.
- Replace all the window screens.
- Replace the air conditioner (this one may not happen anytime soon, as the old one works even if it looks terrible and I got plenty of things to spend money on already...)
- Rebuild cabinets where necessary (a lot of the plywood is shot, but the frames are good) and replace inside.
- Build a new kitchen cabinet for the cooker from scratch, or modify one from Ikea perhaps.
- Possibly build an enclosure for a generator, depending on how I feel about the strength of the frame & my likely budget at that point.
- Build/rebuild the enclosure for the fridge and reinstall it. Oh, perhaps I should test that it actually works on gas first... it definitely works on 110V at least.
- Get new cushions & fabric for the front gaucho.
- Replace the interior light fixtures.
- Get curtains or blinds for the windows.
- Get a new battery, circuit breaker panel, and an inverter/charger.
- Figure out what I'm going to do with the space where the back bed was - desk? Washer/dryer? Storage? We'll see...
- All the other things I'm forgetting.
- Go somewhere!
Easy!
|
|
|
|
|
01-12-2007, 06:49 AM
|
#19
|
Rivet Master 
1973 23' Safari
1977 23' Safari
2018 25' Flying Cloud
Palmer Lake
, Colorado
Join Date: Oct 2005
Posts: 4,092
|
damn, couldn't give you Karma, so here's a public Kudo for your work and your willingness to spend time documenting it for others.
Zep
|
|
|
|
|
01-12-2007, 06:54 AM
|
#20
|
|
Aluminut
2004 25' Safari
.
, Illinois
Join Date: Feb 2003
Posts: 10,477
|
Quote:
|
Originally Posted by Zeppelinium
damn, couldn't give you Karma, so here's a public Kudo for your work and your willingness to spend time documenting it for others.
Zep
|
I got it covered.
|
|
|
|
|
|
|
Currently Active Users Viewing This Thread: 1 (0 members and 1 guests)
|
|
|
 Posting Rules
|
You may not post new threads
You may not post replies
You may not post attachments
You may not edit your posts
HTML code is Off
|
|
|
|

 Recent Discussions
 |
|
|
|
|
|
|
|
|
|
|
|
|
|
|
|
|
|
|
|
|
|


 Linear Mode

